AI Embroidery Digitizing Software for Logos and Complex Designs
Introduction: Why Your Embroidery Needs a Brain Upgrade
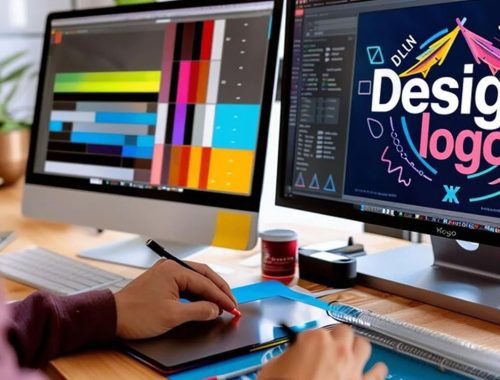
Let’s be real. You have tried manual digitizing. It takes forever. You stare at a logo with tiny text, gradients, and overlapping colors, and your brain hurts just thinking about the stitch paths. That is where AI embroidery digitizing software steps in. It does not just guess. It learns, adapts, and spits out production-ready files that actually make your machine sing. I remember my first disaster with a complex corporate logo. The letters merged into a blob. The curves looked like a zigzag mess. I swore off embroidery for a week. Then I found AI-driven tools, and everything changed. Today, I want to show you how you can take even the wildest vector art and Convert AI File to Embroidery Format without losing your mind—or your weekend.
We will cover what makes AI digitizing different, which software actually works, and how to avoid the rookie mistakes that turn a beautiful logo into a tangled nest of thread.
What Exactly is AI Embroidery Digitizing Software?
Think of traditional digitizing like tracing a drawing by hand. You pick every stitch direction, density, and underlay. It works, but it is slow and depends heavily on your skill level. AI embroidery digitizing software flips the script. It analyzes your artwork, recognizes shapes, textures, and even color transitions, then automatically maps out the most efficient stitch path.
The software learns from thousands of previous designs. It knows that a sharp corner needs a different approach than a smooth curve. It spots small text and adjusts pull compensation before you even hit export. You still have control, but the heavy lifting happens in seconds, not hours.
For logos and complex designs, this is a lifesaver. Logos often have multiple gradients, tiny details, and specific brand colors. A human digitizer might take three hours on a tricky crest. AI does it in five minutes, and you can tweak the results live.
Convert AI File to Embroidery Format – The First Step You Cannot Skip
Here is the golden rule. You must Convert AI File to Embroidery Format before you even think about hooping fabric. Why? Because Adobe Illustrator files (AI) store vector data, not stitch data. Vectors are math. Embroidery files are thread paths. They speak different languages.
AI embroidery software acts as your translator. You drop your AI file into the program. It reads every vector point, every fill color, every stroke. Then it rebuilds that visual information into stitches. For example, a solid red circle in Illustrator becomes a satin or tatami fill in embroidery. The software decides the angle, density, and direction so the thread lays flat and shiny.
Do not try to cheat by converting to a JPEG or PNG first. You lose vector sharpness. AI files keep the edges crisp, which means your final stitches look professional. So remember: open your AI file inside your digitizing software, not on your phone or basic photo editor.
Best AI-Powered Tools for Logos and Complex Designs
Let me break down three solid options that actually deliver. I have used all of them, and each shines for different reasons.
1. Wilcom EmbroideryStudio e4.5 with AI Auto-Digitizing
Wilcom is the gold standard. Their AI does not just trace—it interprets. You feed it a complex logo with bevels and drop shadows, and it suggests stitch types, underlays, and pull comp. The learning curve exists, but once you master it, you fly through designs. Their Edge Run technology makes curves smooth as butter.2. Hatch Embroidery Digitizer
Hatch uses the same engine as Wilcom but with a friendlier face. Perfect for small business owners who digitize their own hats and jackets. The AI auto-digitizing handles up to 15 colors without freaking out. I love their “PhotoStitch” for turning raster logos into clean vectors first, then into embroidery.3. Embrilliance StitchArtist Level 3
Embrilliance takes a hybrid approach. You manually guide the AI, which gives you more control over complex designs. Their path tools let you set stitch angles on overlapping elements, so letters do not disappear into backgrounds. It runs on Mac and Windows, which is rare.All three let you Convert AI File to Embroidery Format natively. No extra plugins. Just drag, drop, and adjust.
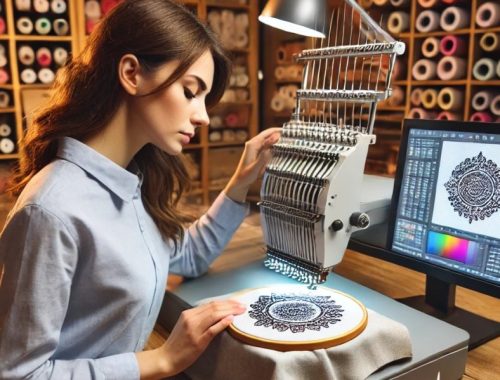
How AI Handles Complex Design Elements Like a Pro
Let us talk about the scary stuff. Gradients. Small serif fonts. Thin lines. Overlapping colors. These elements destroy manual digitizing. But AI eats them for breakfast.
Take a gradient logo. In traditional digitizing, you would use multiple fill blocks with different colors and try to blend them. That takes forever and often looks banded. AI embroidery software analyzes the gradient map and creates a tatami fill with varying densities. It fakes the gradient effect using thread color changes and stitch angles. You get a smooth transition that tricks the eye.
For tiny text, AI measures the letter height against your fabric type. If the font is under 4mm, it switches to a monochrome or simple run stitch instead of a satin. That keeps the letters readable. No more blobby “e” or “a” shapes.
Thin lines? AI uses bean stitches or triple runs to add bulk without widening the line. It recognizes that a 0.5pt stroke in your AI file needs three passes of thread to stand out on a polo shirt.
Overlapping colors get automatic underlays. The software knows that a red shape under a blue shape needs a light underlay to stop the blue from sinking into the red. You do not have to think about pull comp or push-pull. The AI calculates it based on fabric type and stitch direction.
Step-by-Step: From AI File to Finished Embroidery
I want you to see exactly how this works in real life. Grab your AI logo and follow along.
Step 1: Prep your AI file. Remove any live paint, weird transparency effects, or clipping masks. Convert all text to outlines. Flatten layers into simple shapes. The cleaner the vector, the better the AI digitizing.
Step 2: Open your AI embroidery software. Import the AI file directly. Do not convert to another format first.
Step 3: Let the AI auto-digitize. Click the auto-digitize button. Watch the software map stitch types, angles, and underlays. This takes 10 to 30 seconds for a complex design.
Step 4: Review and tweak. Zoom in on small text. Check satin edges for gaps. Adjust stitch density if you see too many thread breaks. The AI gets you 90% there. You handle the final 10%.
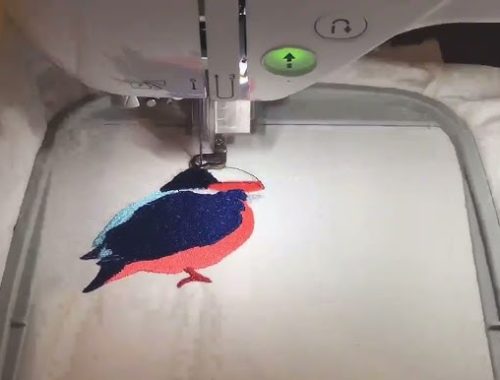
Step 5: Simulate the sew-out. Most AI software includes a 3D viewer. Watch the needle path. Look for trims, jumps, and color changes. Optimize the sequence so your machine does not waste time.
Step 6: Export your embroidery file. Choose your machine format. .DST for Tajima, .PES for Brother, .EXP for Melco. Then hoop up some scrap fabric and test.
That last test matters. Even the best AI cannot guess your specific fabric tension or backing. Run a sample, tweak the pull comp, and save your final version.
Common Mistakes and How AI Fixes Them
You might think AI makes you invincible. It does not. But it does eliminate the biggest human errors.
Mistake one: Ignoring push-pull compensation. When a satin stitch pulls fabric inward, the design shrinks. AI automatically adds pull comp based on stitch length and fabric type. You do not have to guess.
Mistake two: Wrong stitch angles. A human might run all fills at 45 degrees. That works for simple shapes. But complex logos need variable angles to reduce bulk. AI rotates fill angles automatically so you do not get thick, stiff patches.
Mistake three: Too many color changes. Human digitizers often break a design into unnecessary color segments. AI analyzes continuous tones and groups them efficiently. You cut down on trims and thread changes by 30% or more.
Mistake four: Bad underlay for caps. Caps need heavy underlays to stop sinking. AI recognizes when you select a cap frame profile and doubles the underlay density. You get crisp logos on curved surfaces.
Conclusion: Stop Fighting Your Embroidery Machine
AI embroidery digitizing software is not science fiction. It works right now, and it works well for logos and complex designs. You save hours of manual tracing. You eliminate frustrating sew-outs that look nothing like the original art. And you finally get to Convert AI File to Embroidery Format without needing a degree in computer science.
My advice? Download a free trial of Hatch or Wilcom this week. Throw your hardest logo at it. Let the AI do its thing. Then sew it out on an old t-shirt. I promise you will smile when you see those crisp satin edges and readable small text.
The future of embroidery is not just automatic. It is intelligent. And it is waiting for you to stop suffering through manual digitizing. Go try it. Your machine will thank you.
Professional Embroidery Digitizing Services in USA for Small Businesses
Introduction: Why Your Small Business Needs Help with Embroidery Files
You started your small business because you love making things. Maybe you sell custom hats at local markets. Maybe you monogram towels for bridal parties. Or maybe you stitch logos onto uniforms for a youth soccer league. Whatever you make, you hit a wall when the embroidery machine refuses to cooperate. That cute coffee shop logo looks perfect on your screen but stitches out like a blob. The letters touch each other. The details disappear. You waste thread, ruin fabric, and stay up way too late watching YouTube tutorials that do not help. Here is the truth: you do not have to figure this out alone. Embroidery Digitizing Services exist exactly for people like you.
I remember when I first tried to digitize my own logo. A simple circle with three stars and some text. I spent eight hours. Eight. I watched seventeen videos. I tried three different software programs. The final result still looked like a toddler drew it with a crayon while riding a bumpy bus. That is when I finally swallowed my pride and hired a professional digitizer. Best decision I ever made. The file worked perfectly on the first try. My machine ran smooth. The logo looked crisp and professional. And I got back those eight hours to actually run my business.
Small business owners like us wear too many hats already. You are the marketer, the accountant, the shipper, and the customer service rep. Do you really want to add professional digitizer to that list? Probably not. So let me walk you through exactly how professional embroidery digitizing services in the USA work, why they are worth every penny, and how to find the right one for your small business.
What Exactly Is Embroidery Digitizing?
Let me clear up a huge misunderstanding. Digitizing is not the same as converting. When you use a simple image converter, the software just guesses where to put stitches. It is like asking a random stranger to trace your drawing without any instructions. Sometimes it works okay. Most times it does not.
Professional digitizing is completely different. A real human being opens your logo in specialized software. They look at every single detail. They decide exactly where each needle puncture goes. They choose stitch types, angles, densities, and underlay. They set color changes and trim commands. They test the file virtually and fix problems before you ever see it.
Think of it this way. A basic converter gives you a coloring book. A professional digitizer gives you a paint-by-number with the brushes included. Both get you from start to finish, but one saves you a whole lot of frustration.
Why USA-Based Services Matter for Small Businesses
You can find digitizing services on Fiverr for three dollars. I am not kidding. Three dollars for a logo file. And those services are almost always overseas. They work fast because they have to do high volume to make any money. Quality suffers. Communication suffers. And when something goes wrong, good luck getting a revision.
USA-based digitizing services cost more. Expect fifteen to forty dollars per logo depending on size and complexity. But here is what that extra money buys you. First, you get someone who speaks your language fluently. No translation confusion about stitch directions or color orders. Second, you get someone who understands American business hours. You email a problem at 9 AM, you get a response by lunch. Third, you get someone who knows the machines you actually use. Brother, Baby Lock, Janome, Melco. They have tested files on those exact machines.
For a small business, time is money. Waiting three days for an overseas digitizer to respond to a simple question costs you more than the fifteen dollars you saved. I learned this the hard way when a three-dollar digitizer sent me a file that stitched the letters of my business name backwards. Backwards. I had to throw away eight hats. Never again.
What a Professional Digitizer Does That Software Cannot
Let me give you a real example. Imagine your logo has a thin banner with small text. You run it through an automatic converter. The software sees the banner as one big shape and the text as another big shape. It stitches the banner, then tries to stitch the text on top. But the text stitches are too dense, so they punch holes through the banner fabric. The letters look like they are drowning.
A professional digitizer solves this. They split the text into individual letters. They add a special underlay stitch that stabilizes the fabric before the top stitches go down. They reduce the density on the small letters so the needle does not tear through. They even add a tiny pull compensation so the letters do not squish together. The result? Clean, readable text that looks like it was painted on.
Here is another example. Your logo has a gradient. One color fades into another. An automatic converter has no idea what to do with a gradient. It just picks two colors and calls it a day. A professional digitizer creates a technique called tatami blending. They use different stitch directions and densities to create the illusion of fading. It takes skill and experience. No software in the world does this automatically.
How to Find the Right Digitizing Service for Your Small Business
Not all digitizing services are created equal. Here is exactly how to vet them.
First, ask for samples. A good service will have a portfolio of before-and-after images. Look for logos with small text, thin lines, and detailed shapes. If those look crisp, the digitizer knows what they are doing.
Second, ask about turnaround time. For most small business logos, two to four hours is reasonable. Overnight is fine too. But if they promise fifteen minutes for a complex logo, run away. That means they are using automation and calling it manual.
Third, ask about revisions. The best services offer free revisions until you are happy. Because here is the truth. Even professional digitizers sometimes need to tweak a file after you run a test on your specific machine. Your fabric type, your thread brand, your hoop tension. Those variables matter. A good service works with you until the file stitches perfectly on your machine, in your shop, with your materials.
Fourth, ask about file formats. You need PES for most Brother and Baby Lock machines. But maybe you also need DST for a commercial Tajima machine. Or CND for Melco. A professional service provides any format you want at no extra charge.
The Real Cost of Bad Digitizing for Your Business
Let me do some small business math with you. You sell custom hats at twenty dollars each. Your cost for the hat is five dollars. Your labor is three dollars. Your profit per hat is twelve dollars. Now imagine a bad digitizing file ruins ten hats. You lose fifty dollars in materials and thirty dollars in labor. Plus you lose the eighty dollars in sales you would have made. That is one hundred sixty dollars gone. All because you tried to save twenty bucks on digitizing.
Bad digitizing hurts your reputation too. A customer orders five hoodies with their family farm logo. The letters come out crooked. The animal looks like a weird blob. They return the hoodies. They leave a bad review. They tell their friends. That damage lasts way longer than the money you saved.
Professional digitizing is not an expense. It is an investment in consistency, quality, and your brand’s reputation.
When to Use a Service vs. When to DIY
Here is my honest advice. If you make fewer than fifty embroidered items per month, you can probably learn to digitize simple designs yourself. Use beginner software like SewArt or Embrilliance. Stick to bold shapes, large text, and simple logos. You will make mistakes, but that is how you learn.
If you make more than fifty items per month, or if your logos have small text, fine details, or gradients, hire a professional. Your time is worth more than the learning curve. Focus on running your business and satisfying your customers. Let the digitizers do what they do best.
I still digitize some of my own designs. Simple monograms, basic shapes, one-color logos. But anything with my business name or detailed artwork goes straight to my trusted digitizer. That boundary keeps me sane and my customers happy.
Conclusion: Stop Struggling and Start Stitching
You did not start your small business to become an embroidery software expert. You started it to create beautiful products that make people smile. Professional embroidery digitizing services take the technical headache off your plate. They turn your logo into a perfect stitch file. They save you hours of frustration and pounds of wasted thread. They protect your reputation and grow your business.
So here is your action plan. Find two or three USA-based digitizing services. Send them your logo. Ask for samples and pricing. Pick the one that communicates clearly and shows you real results. Run a test stitch on your machine. And then get back to doing what you love: making awesome stuff for your customers.
Your machine is ready. Your thread is waiting. Go make something great.
Professional Tips to Convert Image to Bernette Embroidery Format
Introduction
You have the perfect image on your screen. A crisp logo, a beautiful flower, maybe your kid’s hand-drawn heart. You want to stitch it out on your Bernette machine, but the moment you hit start, everything goes wrong. Thread breaks. Shapes look distorted. Colors shift into a mess. Sound familiar? Here’s the fix. You need to properly Convert Image to Bernette Embroidery Format the right way. Not just any conversion. Professional, production-ready conversion that makes your Bernette sing. I’ve spent years testing different software, tweaking settings, and learning what this machine actually wants. And trust me, it’s picky. But once you understand a few insider tricks, you will turn any JPG, PNG, or BMP into a flawless embroidery file that stitches out exactly how you imagined. Let me walk you through the entire process without the technical headache.
Why Bernette Machines Need Special Attention
Bernette embroidery machines come from the same family as Bernina, but they handle files a bit differently. Your machine reads .EXP or .DST formats mostly, sometimes .PES depending on the model. But here is what nobody tells you. Bernette machines are extremely sensitive to stitch density and pull compensation. Feed them a poorly converted image, and they will rebel with thread nests, birdnesting underneath, or sudden stops mid-design. The good news? Once you learn to convert images properly, your Bernette becomes a workhorse. It produces crisp, clean embroidery that rivals machines costing twice as much. The secret lies in the conversion process itself, not just the final file format.
Step 1: Pick the Right Source Image
You cannot convert any random image and expect magic. Your Bernette needs clean, high-contrast artwork. Open your image on a computer screen. Zoom in. Do you see jagged edges, fuzzy gradients, or tiny details? Those will turn into stitch chaos. For best results, use vector files like .SVG or .EPS whenever possible. But if all you have is a raster image like a JPG or PNG, make sure it has at least 300 DPI resolution. Remove backgrounds. Flatten colors to no more than six or seven shades. Your Bernette does not understand gradients. It sees each shade as a separate color block, often creating random jump stitches between them. Simplify your image first. Use free tools like GIMP or even MS Paint to trace outlines and reduce colors manually.
Step 2: Choose Your Conversion Software Wisely
Not all embroidery digitizing software works well for Bernette. Some free online converters spit out messy .DST files that look fine on screen but stitch horribly. I recommend Wilcom TrueSizer for a free option because it respects Bernette’s stitch limitations. Hatch Embroidery and Embrilliance also do excellent jobs. Stay away from auto-digitizing buttons that promise one-click conversion. They never account for fabric type, thread weight, or your specific machine’s tension preferences. Instead, use software that lets you manually edit stitch angles, underlay, and pull compensation before saving. Your Bernette will thank you with smooth running and zero thread breaks.
Step 3: Manual Tracing Beats Auto-Digitizing Every Time
Here is where most people give up too early. You load an image, click auto-digitize, and the software generates stitches in ten seconds. But look closely. The auto result has weird stitch directions, unnecessary trims, and gaps where solid fills should be. Manual tracing takes longer, maybe fifteen to twenty minutes for a simple logo, but the quality difference is night and day. Open your image in the software’s manual digitizing mode. Use the bezier or polyline tool to trace each color region as a separate object. Assign satin stitches for thin lines and tatami fills for larger areas. This method lets you control exactly where every stitch lands. Your Bernette follows your lead, not some algorithm’s guess.
Step 4: Optimize Stitch Settings for Bernette
Bernette machines prefer certain stitch parameters. Set your satin stitch density between 0.40 and 0.55 mm. Too dense, and the thread compresses, causing tension errors. Too loose, and you see the stabilizer through the design. For fill stitches, use 0.35 to 0.45 mm density. Keep stitch lengths under 5 mm for running stitches, or your machine will struggle with looping. Also, Bernette handles pull compensation best at 0.25 to 0.35 mm outward. That means your software slightly expands shapes so the finished embroidery matches your original image size. Without pull compensation, your final design looks smaller and narrower than expected.
Step 5: Map Colors to Your Available Threads
When you convert an image, the software asks about thread colors. Do not just accept the default color chart. Those random brand conversions rarely match what you own. Instead, manually assign each color region to a thread you actually have in your Bernette thread rack. Stick to polyester or rayon threads for best results. Avoid cheap cotton threads because they break easily. Also, group your color sequence logically. Start with the largest background areas first, then move to smaller foreground details, and finish with outlines. This order reduces jump stitches and thread trims. Your machine runs faster, and you spend less time rethreading.
Step 6: Test With a Small Sample First
Never, and I mean never, load a newly converted file onto expensive fabric without testing. Keep a stash of cheap muslin or cotton and cut-away stabilizer just for tests. Hoop them up, thread your Bernette with cheap but decent quality thread, and run a small version of your design. Watch the first three minutes closely. Does the underlay look even? Are the satin edges clean? Do you see any skipped stitches or thread breaks? If yes, go back to your software and adjust. Often the fix is simple. Reduce density by 10 percent or increase pull compensation slightly. One test saves you from ruining a $50 jacket or a customer’s custom order.
Step 7: Save in the Right Bernette File Format
Here is where beginners trip up. Bernette machines read .EXP files best. Some newer models also accept .PES or .DST, but .EXP remains the most reliable. In your software, choose Export or Save As, then select Bernette .EXP from the list. Name your file without special characters or spaces. Use underscores instead of spaces, like flower_logo_v2.exp. Also, embed a thumbnail preview if your software allows it. Newer Bernette machines show this thumbnail on the screen, making it easy to identify designs without stitching them first. Finally, save a copy in your machine’s native USB format. Format your USB drive to FAT32, not NTFS or exFAT, or your Bernette will not recognize it.
Common Conversion Mistakes That Wreck Your Design
Let me save you from the pain I went through. Do not convert images with drop shadows or glows. Those effects turn into thousands of tiny random stitches that look like a tangled mess. Do not use too many small details. Your Bernette needle is 0.4 mm thick. Any detail smaller than that simply cannot stitch cleanly. Do not forget underlay. Underlay stitches go down first and stabilize the fabric. Without underlay, your top stitches sink into the material and lose definition. Also, avoid three-quarter satin stitches. Bernette handles full satin or full run stitches best. Anything in between causes uneven edges.
Pro Tips for Batch Converting Multiple Images
If you run a small embroidery business or make gifts regularly, you will convert many images. Create a template in your digitizing software with your favorite Bernette settings. Save it as bernette_default.dst. Then for each new image, open that template and paste your traced objects inside. This trick saves hours of resetting stitch densities and pull compensation every single time. Also, keep a conversion log. Note which settings worked for cotton, which for denim, and which for towels. Over time, you will build a personal cheat sheet that makes future conversions take five minutes instead of thirty.
How to Troubleshoot When Things Go Wrong
Your converted file stitches out badly. Now what? First, check your hoop tension. Bernette machines need slightly looser top tension for dense designs. Turn the dial down by a quarter turn and test again. Second, look at your stabilizer. For heavy designs, use two layers of cut-away. For light designs, one layer of tear-away works fine. Third, examine your needle. A bent or dull needle causes most stitch problems after conversion. Swap in a fresh size 75/11 needle. If problems persist, reopen your digitizing software and reduce the overall stitch count by 20 percent. Sometimes less stitching creates a better result.
Conclusion
Converting an image for your Bernette embroidery machine does not need to feel like rocket science. Start with a clean, simple image. Trace it manually instead of relying on auto-digitizing. Adjust stitch density and pull compensation specifically for your machine. Test on scrap fabric before stitching your final piece. Save as .EXP on a properly formatted USB drive. Follow these steps, and you will consistently produce embroidery that looks professional, holds up to washing, and makes you proud to show off. Your Bernette is a capable machine. Give it well-converted files, and it will reward you with hours of trouble-free stitching. So grab that image you have been avoiding, open your digitizing software, and start tracing. Your first successful conversion is only twenty minutes away.