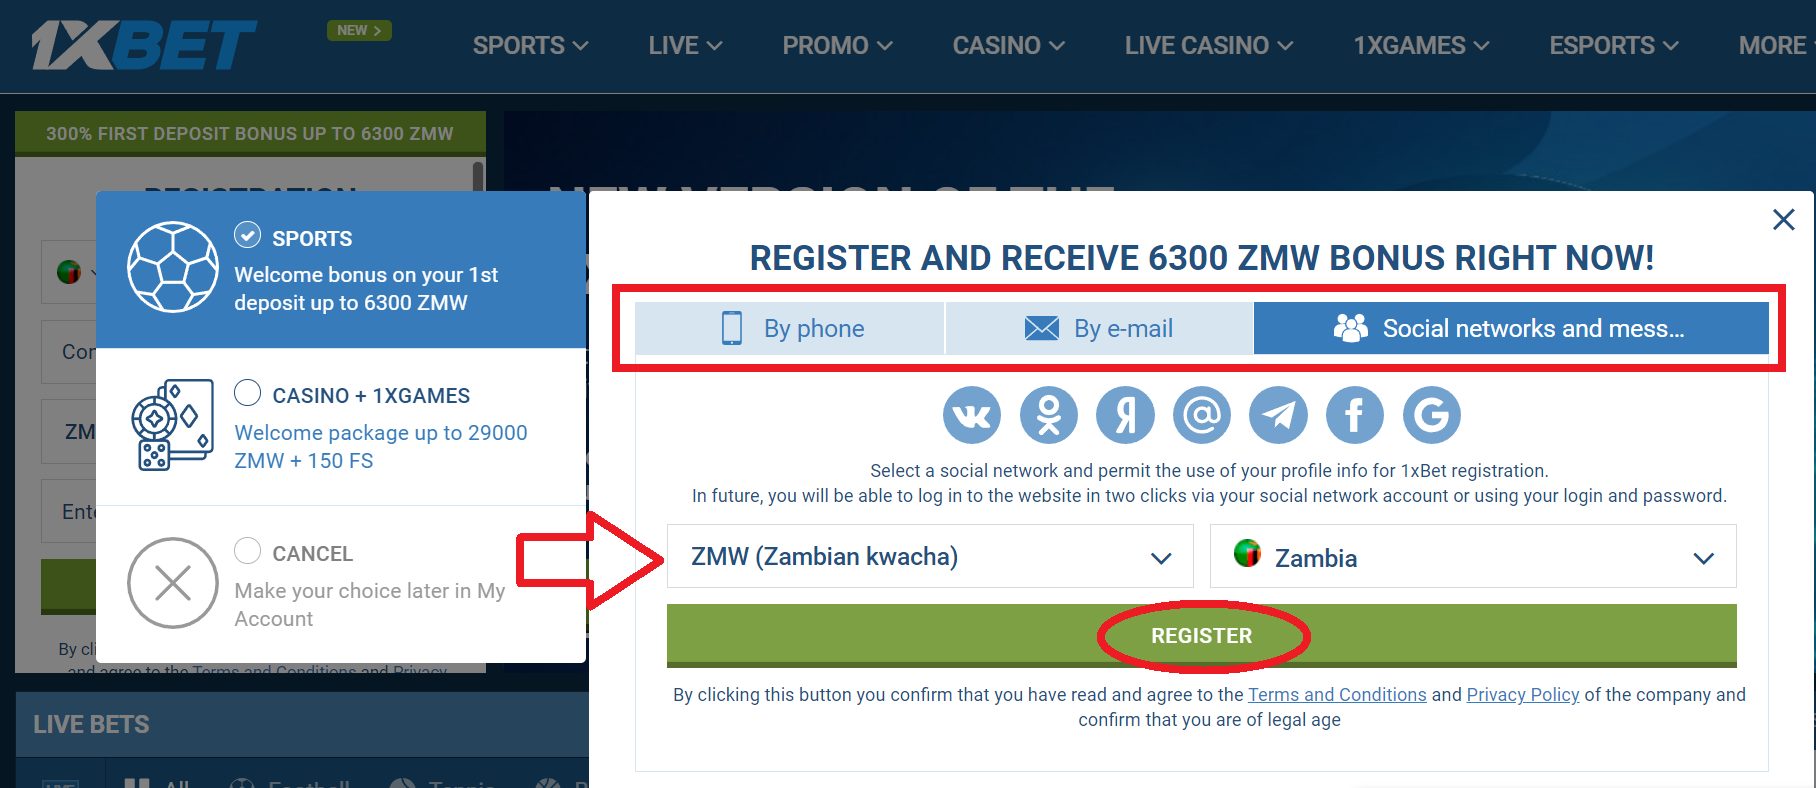
How to Recover Deleted Instagram DMs on Android – Complete Step-by-Step Guide
Immediate actions: toggle Airplane Mode to stop any further writes to the app, do not open the messaging thread, and avoid clearing app cache. If you have any type of inquiries concerning where and exactly how to utilize 1xbet login registration, you can call us at our internet site. In the photo‑sharing app go to Settings → Security → Download Your Information (request via email); the platform typically prepares the ZIP within 24–72 hours. When you get the ZIP, extract and look for files named messages.json or something similar – those contain message bodies, sender IDs and UNIX timestamps.
If the export is absent or incomplete: check other active sessions first – open the web inbox in a desktop browser and any logged‑in tablets or secondary phones; messages often remain on other devices. If the account is linked to the social network’s chat (Facebook/Meta Messenger), inspect that inbox – cross‑linked conversations sometimes keep copies of direct threads.
Phone backup options: on Google‑powered handsets, confirm Settings → Google → Backup for app data snapshots. If a recent backup exists, restore that snapshot to a spare device or restore the handset from that backup (restore may require a factory reset). Advanced option for power users: use ADB from a PC (install Platform Tools) and run adb backup -noapk com.instagram.android -f app.ab, then extract with Android Backup Extractor (abe.jar) to inspect app files for message databases.
Rooted device method: pull the app database directly: use adb shell or a root file manager to copy /data/data/com.instagram.android/databases/ (or equivalent package path) to your PC, then search for SQLite files or JSON blobs containing thread text and timestamps. Use sqlite3 or DB Browser for SQLite to query message tables; timestamps are usually stored as integer epochs – convert to human time during review.
Safety and limits: third‑party “message recovery” apps frequently require root and full device access – avoid unknown tools and do not grant permissions to untrusted vendors. Preserve the original ZIP export and any adb/database copies; work on duplicates only. If you need exact JSON field names or an epoch conversion snippet, extract messages.json and share a sanitized sample and I will point to the exact keys and conversion formula.
Immediate steps to minimize data loss
Stop using the messaging app and enable Airplane Mode on your phone to prevent further synchronizations or overwrites.
-
Cut network access:
- Swipe down the quick settings and tap the airplane icon; confirm Wi‑Fi and mobile data are off.
- If Airplane Mode is not available, disable Wi‑Fi and mobile data from Settings → Network or Connections.
-
Freeze the app process:
- Open Settings → Apps (or Apps & notifications) → locate the social app → Force stop.
- Do not open the app after force stopping; avoid sending or receiving messages inside it.
-
Turn off account sync and background activity:
- Settings → Accounts → select the account used by the app → disable Sync for that account.
- Settings → Apps → [app] → Mobile data & Wi‑Fi → disable Background data.
- Enable global Data Saver if available so background transfers are blocked.
-
Prevent automatic app updates:
- Open the Play Store → Profile → Settings → Network preferences → Auto-update apps → Don’t auto-update apps.
- Avoid updating or reinstalling the app until a backup is secured.
-
Do NOT clear app data or uninstall the app:
- Clearing cache or storage and uninstalling will remove local copies that might remain accessible to forensic tools.
-
Create immediate copies of visible content:
- Take screenshots of conversations, timestamps, and profile info; export or email them to a separate device or cloud account.
- Save any media files to an external SD card or transfer to a computer via USB without opening the app first.
-
Request platform account data:
- Open the social platform’s account or privacy settings and start a data-download request (look for “Request data” or “Download your information”).
- Expect a processing window (often 24–72 hours); initiating the request preserves a retrievable copy held by the provider.
-
Minimize writes to internal storage:
- Avoid taking photos, installing apps, or saving files on the phone to reduce chance of overwriting recoverable blocks.
- If immediate capture is needed, use an external device to receive files instead of the phone’s internal memory.
-
Make a full device backup as soon as possible:
- Use the built-in backup tool: Settings → System → Backup → Back up now (save to cloud or computer).
- If you have access to a computer and technical skill, produce a bit‑level or application‑data backup using vendor tools; label and encrypt the backup file.
-
Document actions taken:
- Log each step with timestamps (what you did, when, and why). This record helps later analysis and any support requests.
Stop using the Instagram app immediately
Force-stop the app now: open Settings → Apps & notifications → See all apps → select the app → tap Force stop, then remove it from Recent Apps. Do not open the client again; every launch may sync or overwrite local storage.
Cut network access at system level: enable Airplane mode or disable Wi‑Fi and mobile data. Next, go to Settings → Network & internet → Data usage → Mobile data usage → select the app and turn off Background data and any Unrestricted data permissions.
Do not clear cache or storage. Instead, make a raw copy of the device filesystem before any changes. If you can enable developer options and USB debugging, connect to a computer and run a full backup: adb backup -f backup.ab -apk -all. For targeted extraction, use adb pull /sdcard/ and, if you have root or custom recovery, create a full image (TWRP nandroid) and store it externally.
Disable automatic app updates in the Play Store to prevent data-structure changes. On a desktop, log into the service’s web interface and submit a data download request (account settings → Privacy/Data Download); note processing can take up to 48–72 hours. Preserve any received archives on a separate drive and avoid restoring or reinstalling the mobile client until analysis is complete.
-
Smart TV vs Android TV – Differences, Features & Buying Guide
Recommendation: choose a Google-backed operating system on your next display if you want the widest app catalog, built-in casting and voice assistant support; opt for a manufacturer’s native interface when you need custom picture presets, integrated tuners or lower latency out of the box.
Hardware checklist: prefer a panel with 3840×2160 resolution for 4K content and at least 60 Hz refresh for movies; select 120 Hz and HDMI 2.1 (4K@120Hz, VRR, ALLM) if you use next-gen consoles. Target input lag under 15 ms in game mode. Minimum system memory: 2 GB RAM / 8 GB storage; longevity target: 4 GB RAM / 16 GB storage or higher for smoother app updates and caching.
Software and app availability: Google-certified sets access the Play Store ecosystem, Chromecast casting and Google Assistant; manufacturer platforms often include bespoke apps, exclusive picture/AI modes and tighter integration with the maker’s peripherals. Major streamers (Netflix, Prime Video, Disney+, Hulu, YouTube, Max) are generally supported across both approaches, but region-specific or niche services may appear only on Google’s catalog–verify prior to purchase. Check codec/container support for HDR formats you value: Dolby Vision, HDR10+, HDR10 and audio passthrough for Dolby Atmos if you use external sound systems.
Updates, privacy and price guidance: confirm the vendor’s update policy–look for at least 2 years of security patches and periodic OS updates; factory settings should allow easy permission control for microphones and cameras. Typical price bands: under $300 for budget internet-enabled sets, $300–$800 for midrange models with better panels and chips, above $800 for flagship displays with premium HDR and sound. Final tip: prioritize the platform that matches your app usage and signal chain (soundbar/AV receiver), then match the panel and I/O to your gaming and HDR needs.
Core Technical Differences
Pick a model with a modern system-on-chip that includes hardware AV1 decode, at least 3–4 GB RAM and UFS or eMMC 5.1 storage of 16 GB or more if you expect frequent app installs and UI fluidity.
Processor and graphics: consumer devices use either purpose-built set-top SoCs or mobile-derived SoCs. Look for ARM core generations (Cortex‑A53 → A55 → A73/A76) and GPU families (Mali, Adreno, VideoCore). Newer cores and GPUs reduce UI frame drops, accelerate 3D interfaces and lower app latency; older A53-only solutions can struggle with complex launchers or advanced streaming overlays.
Memory and flash: RAM governs multitasking and buffered decoding. Minimum 2 GB handles basic menus; 3–4 GB yields smooth app switching; 6+ GB benefits heavy multi-app use and local caching. Storage type matters more than raw capacity: UFS (serial high-speed) offers much faster random I/O and app install times compared with eMMC; prefer UFS or eMMC 5.1 with at least 16 GB free for system updates and app caches.
Codec and video acceleration: hardware decode support for H. If you loved this write-up and you would like to get additional facts pertaining to 1xbet philippines app download kindly stop by our own web-page. 264, H.265/HEVC and VP9 is common; AV1 hardware decode is required for efficient modern 4K streaming from many services. Verify maximum hardware decode resolution and frame rate (e.g., 4K@60) and HDR pipeline support (HDR10, Dolby Vision, HLG) – lacking native decoder/HDR pipeline forces CPU fallback and causes dropped frames or higher bitrates.
Audio, DRM and security: check for hardware-backed DRM (Widevine L1 or equivalent) when you need full-resolution encrypted streams. Secure boot and a Trusted Execution Environment reduce attack surface for credentials and keys; absence of these features can restrict playback quality for premium services.
Connectivity and I/O: prefer gigabit Ethernet over 100 Mbps for reliable 4K streaming; Wi‑Fi 6 (802.11ax) reduces interference and improves sustained throughput compared with Wi‑Fi 5 (802.11ac). HDMI version matters: HDMI 2.0 handles 4K@60; HDMI 2.1 required for 4K@120, VRR and ALLM if using modern game consoles. Bluetooth 5.x improves input latency and range for remote controls and audio devices.
Updates, partitioning and manufacturer policy: firmware with A/B partitions and signed OTA images supports safer updates and rollback. Platforms built on mainstream mobile stacks usually receive more frequent security patches and broader app compatibility via standard app stores; strictly vendor-locked stacks may have limited app catalogs and slower patch cadence. Verify update policy length (months/years) before purchase.
OS architecture: update cadence and fragmentation
Choose a display whose maker documents a firm update policy: monthly security patches, yearly major-OS upgrades for at least two years, and OTA firmware that supports A/B partitions with rollback.
-
Expected cadence (practical targets)
- Security patches: monthly is ideal; accept quarterly only if clearly stated by vendor.
- Minor/bugfix firmware: every 1–3 months for active models.
- Major OS upgrades: roughly one per year; require vendor commitment for 2–3 release cycles.
-
Primary fragmentation drivers
- SoC vendor BSPs and closed-source drivers that prevent mainline kernel updates.
- OEM forks of the base platform (custom launchers, middleware) that diverge from upstream APIs.
- Different HAL implementations for audio, video and DRM, causing app compatibility variance across models.
- Proprietary DRM and certification requirements (Widevine level, Play certification) that affect streaming app behavior.
-
SoC vendor patterns (practical guidance)
- Amlogic, Rockchip: generally better community/mainline kernel activity; higher chance of third-party support and longer updateability.
- MediaTek (incl. MStar lineage): mixed–some mainstream SoCs now receive improved upstreaming, but confirm vendor policy per model.
- Broadcom, Realtek: often rely on closed BSPs; expect slower or no OS-version upgrades and limited kernel patching.
-
Security/update technology to look for
- A/B (seamless) update partitions and verified boot signatures.
- Delta OTA packages to reduce update size and failure rates.
- Public release notes with CVE/security patch dates.
- Signed, timestamped firmware and documented rollback protection behavior.
-
Real-world effects of fragmentation

- App breaks or reduced performance after platform forks or driver changes.
- Delayed availability of new APIs for app developers; some apps may be absent from device app stores.
- Streaming services may restrict quality (e.g., HD/HDR) based on DRM certification status.
-
Pre-purchase checklist (actionable)
- Find the vendor’s published update policy (patch cadence, length of OS support).
- Identify the SoC model and search kernel/mainline support and recent commits on public repos.
- Verify presence of Google Play certification and Widevine L1 (if streaming quality matters).
- Check recent firmware release notes for security patch dates and frequency.
- Search technical forums (XDA, vendor community) for reports of update reliability and rollback cases.
When update longevity and app compatibility are priorities, prefer displays running close-to-AOSP stacks with transparent update schedules, A/B OTA, and SoCs that have demonstrated upstream kernel support; otherwise expect faster fragmentation and shorter effective lifetime.
-
Who Invented Android? Creators, History & Key Milestones
Credit for the platform’s origin belongs to a small startup founded in October 2003 by Andy Rubin, Rich Miner, Nick Sears and Chris White; that company was acquired by Google in August 2005 for roughly $50 million. For any factual article, start with these names and dates as the primary attribution points.
For a compact factual timeline include these firm anchors: the industry consortium announcement on 5 November 2007 (Open Handset Alliance), the initial public SDK and platform release on 23 September 2008, and the first commercial handset (HTC Dream / T‑Mobile G1) shipping on 22 October 2008. Use these events to structure a chronology rather than relying on hearsay.
Focus technical coverage on concrete decisions and their consequences: selection of the Linux kernel as the foundation, the original bytecode runtime (Dalvik) and the later switch to ART as the runtime strategy (runtime default change around the 2014 major release). Include release notes, kernel version baselines and API stability points to explain architectural shifts.
Research sources to cite: original press releases from the acquiring company, Open Handset Alliance documentation, the open-source repository commit history, interview transcripts with the founders and early engineers, and first‑device hardware specifications. Organize your article into founder attributions, decisive engineering choices, first commercial deployment, and measurable adoption indicators (marketplace launch, carrier partnerships, OEM rollouts) to deliver a precise, evidence‑based introduction.
Origins: Founding of Android Inc.
Record the formation details: Android Inc. was founded in October 2003 in Palo Alto, California by Andy Rubin, Rich Miner, Nick Sears and Chris White.
Founders’ roles: Rubin led platform and systems engineering; Miner handled developer and partner outreach; Sears contributed carrier and distribution insight; White directed user-interface design and interaction prototyping.
Initial technical aim: build a Linux-kernel-based operating system and a Java-language application framework for small connected consumer devices (early pitches referenced digital cameras and mobile handsets).
Early structure and resources: private seed-stage startup with headcount under a dozen during the first year, financed by founders and angel backers, operating from a Palo Alto office with hires focused on Linux, embedded systems, Java APIs and UI design.
Early deliverables: within roughly the first 12–24 months the team produced an OS prototype targeting ARM-class processors, a native Linux core and an application model for third-party programs; prototypes were used to solicit interest from handset manufacturers and network operators.
Research and verification steps: consult contemporaneous tech-press coverage (2003–2005), interviews with the four founders, Wayback Machine snapshots of the company’s web presence, early job listings and patent records, plus primary-source filings and archived conference presentations to validate timeline and technical claims.
The founding team and day‑to‑day roles
Assign explicit functional ownership among founders immediately: technical platform & architecture, product & partnerships, user interface & developer experience, and operations & finance. For Android’s founding quartet that meant Andy Rubin driving system architecture and platform engineering; Chris White owning UI, demo apps and design direction; Rich Miner leading developer outreach, press and early partner evangelism; Nick Sears handling carrier and commercial negotiations.
Daily activities for the technical lead should prioritize: architecture reviews, core code commits, CI/build health checks, kernel and HAL integration, weekly API freeze decisions and key hiring for systems engineers. Recommended time split: ~60% hands‑on engineering, ~25% recruiting & technical interviews, ~15% partner technical calls and roadmap alignment.
The UX/design lead should produce reference UI flows, prototype apps, pixel/interaction specs, and developer samples. Daily cadence: design review with engineers, usability testing on reference hardware, maintaining the SDK sample catalog, and preparing demo scripts for partner meetings. Expect a 50/30/20 split between design work, cross‑team sync and partner demos.
Business and partnerships-facing founders must maintain pipeline metrics and carrier touchpoints: daily triage of inbound partner requests, weekly slot for technical deep dives with carriers/OEMs, monthly commercial term reviews, and active management of press & developer relations. Use a CRM to track integration milestones, contractual dependencies and certification checkpoints.
Operations should run CI/CD, automated test farms (emulator + hardware), release tagging, and build rollbacks. Establish a 15‑minute morning standup, a twice‑weekly integration sync, and a weekly product demo. Implement a build failure SLA: first fix within 4 hours, full revert policy if build remains broken after 24 hours.
Staffing roadmap: months 0–6 hire 4–6 engineers (systems, framework, tools), 1 UI designer, 1 QA. Months 6–18 expand to 15–25 with dedicated teams for kernel/driver integration, runtime/VM, framework APIs, apps, developer tools, and partner engineering. Early hires should have proven experience with Linux kernel or embedded systems and one with carrier integration history.
Key deliverables to track: stable SDK with emulator, reference hardware booting reliable builds, public API spec, sample apps, automated test coverage for platform interfaces, and signed NDAs/LoAs with at least one carrier. Use concrete KPIs: nightly build success rate >95%, mean time to resolve critical integration blockers <48 hours, and developer onboarding time (first successful app build) under 2 hours.
Decision governance: create a lightweight architecture board (founders + senior engineers) that meets weekly and issues discrete design decisions with documented rationale and fallbacks. If you cherished this report and you would like to acquire extra information with regards to download 1xbet apk for android kindly pay a visit to our own page. Enforce an API stability window before public SDK releases and require a compatibility test suite to pass for partner builds.
Oppo Reno4 Android Version – Which Android Does It Run?
Out of the box: Factory firmware: Google’s mobile OS 10 (API 29) + ColorOS 7. For those who have any kind of inquiries regarding exactly where along with how you can utilize download 1xbet apk for android, you can e-mail us on our website. 2. Official over‑the‑air updates have provided a major platform upgrade to 11 (API 30) on most unlocked and manufacturer‑distributed variants; carrier‑locked units may see delayed rollouts.
How to check and install updates: Open Settings → About phone → Software information to view the current platform number and skin build. Use Settings → Software Update or the device’s Support/Software Assistant app to check for official packages. Before applying a major platform update, backup your data, connect to Wi‑Fi, ensure battery is above 50% and free storage exceeds ~3 GB.
What platform 11 delivers: One‑time app permissions, strengthened privacy controls, native screen recording, refined background process handling and other API 30 features. Maintain monthly security patches for ongoing protection; if no official upgrade appears for your exact model/region, consult the manufacturer’s update portal or carrier support.
Advanced route (for experienced users): Community builds and aftermarket images (for example, LineageOS ports) can offer newer platform levels, but they require an unlocked bootloader and will typically void warranty. Follow trusted community instructions, verify compatibility with your exact SKU and always keep a verified backup before flashing.
Official Android Version Shipped with Oppo Reno4
Shipped out of the box with ColorOS 7.2 layered on the tenth major release of Google’s mobile operating system (API level 29); seek the official upgrade to ColorOS 11 (API level 30) for a move to the next major release if it appears for your regional firmware.
- Factory software at launch: ColorOS 7.2 (base: API 29).
- Official major upgrade issued for many units: ColorOS 11 (base: API 30) – availability varies by region and carrier.
- Security patches: check the “Security patch level” in Settings → About phone → Software information to confirm monthly patch recency.
Practical update checklist before applying a major OTA:
- Full backup (cloud or local) of photos, messages and app data.
- Charge device to at least 50% or keep connected to a charger during the update.
- Connect to stable Wi‑Fi and ensure at least 3–5 GB free internal storage for the package.
- Install the update via Settings → About phone → Software updates or the manufacturer’s support app/webpage.
- If OTA is unavailable, contact the official support channel for your region; avoid unofficial builds to prevent warranty and stability risks.
If you experience instability after a major system upgrade, perform a full backup and then a factory reset to clear legacy configuration conflicts; recheck for minor updates afterwards to obtain the latest security and bug fixes.
Exact Android release and build number at launch
Answer: the handset launched with ColorOS 7.2 (based on Google mobile OS 10); the factory firmware carried the initial build label CPH2007_11_A.03 and a June 2020 security patch level.
Confirm on a unit by opening Settings → About phone → Build number; the original out-of-box string matches the firmware tag shown above. For verification against official files, compare that build label with the release note or OTA package name on the manufacturer’s support page.
32GB Android Phones – How Much RAM Do They Have?
Recommendation: For a thirty-two gigabyte handset running Google’s mobile platform, target at least 4 GB of system memory; opt for 6 GB if you play 3D games or keep many apps active in the background; choose 8 GB if you expect to keep the device 3+ years or run desktop-class productivity apps.
Common factory pairings for thirty-two gigabyte units include 2 GB, 3 GB, 4 GB, 6 GB and 8 GB. Modern builds of the Google platform typically reserve roughly 1.5–2 GB of working memory at idle, so usable headroom equals total system memory minus that baseline.
Use-case guidance: basic use (calls, messaging, lightweight web) is acceptable on 2–3 GB; everyday multitasking and common social apps benefit from 4 GB; sustained gaming, heavy multitasking or frequent app switching performs best with 6–8 GB. For smoother app updates and fewer slowdowns over time, favour higher memory when the budget allows.
Storage realities matter: firmware and preinstalled software commonly consume about 6–12 GB, leaving roughly 20–26 GB of user-accessible space on a thirty-two gigabyte unit. Limited free storage increases swap activity and magnifies low-memory bottlenecks; prefer models with faster flash (UFS) and a microSD slot or plan cloud backup to mitigate constraints.
Quick checklist: minimum 4 GB for general use, 6 GB for heavier usage; verify flash type (UFS vs eMMC), confirm OS update policy from the vendor, check free storage immediately after first boot, and consider disabling aggressive background sync or using lighter app alternatives to improve responsiveness on lower-memory models.
Typical RAM in 32GB Android Phones
Choose devices with at least 3–4 GB of system memory when paired with 32‑gig storage; 2 GB models will hit frequent app reloads and slower multitasking.
Common factory pairings for 32‑gig models: 2 GB – legacy ultra‑budget; 3 GB – basic entry units; 4 GB – mainstream budget; 6 GB – solid midrange; 8 GB and above – premium behavior. Most recent low‑cost releases trend toward 3–4 GB as the standard.
Memory type matters: LPDDR3 is oldest and slowest, LPDDR4x provides a large leap in bandwidth and efficiency, LPDDR5 raises throughput further and reduces power draw. Prefer LPDDR4x or LPDDR5 when available; listings and chipset specs show the generation.
Several manufacturers offer virtual memory (storage‑backed expansion) adding 1–3 GB of usable background capacity. Treat that as slower than physical memory–useful for brief background retention but not a substitute for higher physical RAM when running heavy apps or games.
Recommendation: casual users and light multitaskers will be satisfied with 3–4 GB; heavy multitaskers, mobile gamers or power users should target 6 GB or more and consider models with expandable storage or a 64‑gig/128‑gig option to avoid performance degradation from full internal storage.
Common RAM sizes found in 32GB models
Choose 3–4 GB of system memory for a balanced everyday experience; select 6 GB when you run multiple heavy apps or play graphics-intensive titles frequently.
1 GB – legacy ultra-budget variants: suitable only for calls, SMS and the lightest apps; expect constant app reloads and limited compatibility with recent mobile OS releases.

2 GB – entry-level: handles messaging, light web browsing and single-app use. Suitable when minimal background activity is acceptable; plan on aggressive app termination by the system.
3 GB – practical minimum for modern use: supports social apps, navigation plus music, and light multitasking (2–3 active apps) with fewer reloads than 2 GB devices.
4 GB – comfortable daily driver: smooth switching between multiple apps, casual gaming and moderate photo editing. Offers noticeably better longevity against future software updates than 2–3 GB models.
6 GB – for power users: maintains many background services, heavy multitasking and demanding games without frequent stutters; pairs best with faster internal storage (UFS) to minimize frame drops and loading delays.
8 GB and above – uncommon in this storage bracket but available in some variants; provides near-desktop multitasking and the longest practical lifespan for feature updates.
Practical checklist: prefer higher system memory over extra camera modules if multitasking matters; verify idle memory footprint of the vendor skin (modern builds often use ~1.5–2.5 GB when idle); treat virtual memory/expandable memory features as slower stopgaps because they use flash and increase wear on storage.
If you’re ready to check out more information about 1xbet philippines registration review the web page.
Smart TV vs Android TV – What’s the Difference & Which to Buy?
Recommendation: Choose a Google-powered display if you want broad app catalogue, frequent OS patches and tight mobile integration; choose a manufacturer-built connected platform when price, built-in broadcast tuners or unique hardware features matter more.
Concrete numbers: Google Play for large-screen devices hosts thousands of streaming, gaming and utility titles. Aim for at least 2 GB RAM and 8 GB storage for smooth navigation and app installs; prefer chipsets with ARM Cortex-A55 cores or better for reliable 4K decoding. For 4K@60Hz HDR verify HDMI 2.0 or 2.1 support; for 120Hz gaming and advanced sync require HDMI 2.1 plus VRR and ALLM. When you loved this post and you would want to receive details about 1xbet mobile download assure visit our internet site. Expect software update windows commonly spanning 2–3 years on first-party Google-based models, while manufacturer OS update cadence varies by brand.
Connectivity checklist: Wi‑Fi 5 (802.11ac) minimum, Wi‑Fi 6 preferred for multi-device households; Bluetooth 5.0 or higher for audio peripherals; ethernet port for stable 4K streaming. Audio: look for eARC support and passthrough for Dolby Atmos when using external soundbars. Remote: prefer models with voice assistant integration, dedicated casting support and backlit controls for night use.
Final guidance: For users who stream across multiple subscriptions, play casual cloud games and rely on frequent app updates, a Google-powered display will generally deliver better app compatibility and smoother casting from phones. For shoppers focused on panel quality, brightness, local dimming and price per inch, a manufacturer-connected set from brands such as Samsung, LG, Hisense or TCL may provide superior panel options without extra platform complexity.
Understanding the Terms: Smart TV vs Android TV
Choose a display running Google’s open operating system when priority is app variety, timely security patches, built-in casting and voice search; opt for a manufacturer’s native interface if simplicity and lower cost matter more.
Two main categories exist: manufacturer-built platform with custom launcher and limited app selection, and Google-led open platform with Play Store access and standardized APIs for living-room applications.
Ecosystem differences matter: Google-led option provides thousands of apps, regular updates from major developers, broader codec support (HEVC, AV1, Dolby Vision, Dolby Atmos) when hardware permits, and uniform input support for controllers and remotes.
Update cadence varies: Google-led devices commonly receive about 2 years of major OS revisions plus security patches; manufacturer platforms often provide sporadic firmware fixes, sometimes for only a single year, so verify vendor update policy before purchase.
Hardware baseline recommendations: target 3 GB RAM and 16 GB flash storage for smooth multitasking and multiple app installs; accept minimum of 2 GB RAM and 8 GB storage only for very light use. Prefer quad-core or better SoC with hardware decoding for HEVC and AV1, Wi‑Fi 5 or Wi‑Fi 6, and low input lag if gaming is planned.

Developer and power-user features: if sideloading, adb access or emulator support is required, select Google-led platform or a separate streaming box; many OEM systems restrict app sideloads and advanced debugging access.
Price guide and decision tips: USB-stick players with Google OS typically start near $30–$60; mid-range displays with factory-installed Google OS often range $300–$700; premium sets with higher-end panels and Google OS commonly exceed $800. For long-term app access and frequent updates choose Google-led device or external box; for basic streaming of major services and lowest upfront cost, a manufacturer’s native platform can meet needs.

Define “Smart TV” in practical terms
Recommendation: choose a connected television that supports 4K HDR, AV1 hardware decoding, HDMI 2.1 with eARC and VRR, Wi‑Fi 6 or gigabit Ethernet, at least 2 GB RAM and 8 GB user storage, plus a published firmware update policy.

A connected television is a display with an integrated operating system and app marketplace that runs streaming clients (Netflix, Prime Video, YouTube), handles local network playback, and accepts phone/tablet casting without an external set-top box. Focus on real-world features that affect daily use: app availability, update frequency, codec support, input options, and responsiveness.
Hardware expectations: quad-core CPU (ARM Cortex-A53 or better) with GPU capable of 4K60 HDR; minimum 2 GB RAM and 8 GB flash to avoid sluggish app performance; AV1 + HEVC + VP9 decoding for efficient 4K streaming; HDR10, HDR10+ and Dolby Vision support for best picture on compatible content; Dolby Atmos passthrough via eARC and DTS for advanced audio setups.
Inputs and performance metrics: at least three HDMI ports with one offering full HDMI 2.1 feature set (4K120, VRR, ALLM). Aim for input lag under 20 ms at 60 Hz and under 10 ms at 120 Hz for responsive gaming. Prefer gigabit Ethernet for stable 4K streams; use Wi‑Fi 6 when wired connection is impractical.
Software and update policy: verify presence of major streaming apps plus a clear app-install mechanism. Check vendor update cadence before purchase – target manufacturers that provide security and compatibility updates for a minimum of two years, with monthly or quarterly firmware patches when available. Confirm whether sideloading or alternative app stores are allowed if required for niche apps.
Privacy and connectivity controls: confirm presence of microphone/camera hardware kill switches or obvious software toggles. Review privacy policy for data collection and telemetry options. Configure guest network or VLAN for device isolation when needed; prefer separate wireless SSID for personal devices.
Checklist: 4K60+ with AV1; HDMI 2.1 on at least one input; Wi‑Fi 6 or gigabit Ethernet; >=2 GB RAM and >=8 GB storage; monthly/quarterly firmware updates and minimum two years of vendor support; hardware or software privacy toggles; native support for Netflix, Prime Video, YouTube plus casting protocol or AirPlay; input lag <20 ms at 60 Hz for smooth gaming.
15 Best Little-Known Android Apps — Hidden Gems You Need to Try
This collection highlights 15 under-the-radar mobile utilities for Google’s smartphone platform across productivity, privacy, media and automation. Each entry in the main list includes: install size (MB), last update date, visible permissions, price model (free / freemium / one-time), and a concise one-line use case so readers can pick the right tool for a specific task.
Selection criteria: active maintenance (last update within 12 months), user rating ≥ 4.0 when available, realistic install footprint (preferably <50 MB), minimal access to sensitive permissions (avoid SMS/call access unless clearly justified), and clear data storage policies (local-only or documented cloud processing). Items flagged open-source include a direct repo link where possible.
Quick practical checks before installing: verify the permission list in the store listing, inspect battery usage in system settings after 24 hours, confirm whether backup/export exists, and test any automation rules in a sandbox profile. For network-blocking or VPN-based privacy tools prefer solutions that use a local VPN tunnel without routing traffic through third-party servers; expected CPU impact should remain low (<5% under light load).
The following entries are organized to show immediate value: one-line recommendation, concrete metrics (size, permissions, battery behavior), and the ideal scenario for deployment (offline task management, lightweight media processing, on-device encryption, or automation). Scroll down to find the item that matches a specific workflow and the exact installation footprint for planning storage and data usage.
Offline Notes: Lightweight Markdown Editor
Recommendation: Markor – offline-first, minimal Markdown editor with file-based storage, small footprint (<10 MB), open-source and usable without any network permissions.
- Core capabilities
- Local files: edit .md, .markdown, .txt and todo.txt directly in a chosen folder (internal storage or SD card).
- Live preview and split view: simultaneous editing and rendered output for faster formatting checks.
- Task lists: standard GitHub-style checkboxes (- [ ] / – [x]) with quick toggle support.
- Export & share: HTML export and share-to-print; open notes from any file manager or file mount.
- Small resource use: runs smoothly on low-RAM handsets, negligible battery impact when idle.
- Quick setup (3 minutes)
- Create a dedicated folder (suggestion: Documents/Notes).
- Open Settings → Files → Default directory → select Documents/Notes (permits SD access if needed).
- Settings → Editor → Autosave interval → set 3–10 seconds for fault-tolerant editing.
- Enable Split view in Settings → Viewer for on-device preview while typing.
- Practical templates and snippets
- Meeting note template:
– Date: 2026-03-16
– Attendees:
– Agenda:
– Action items: - Project header (YAML front matter):
—
title: Project X
tags: [project, backlog]
created: 2026-03-16
— - Quick task pattern:
– [ ] Task description @due(2026-03-20) #project
- Meeting note template:
- Search, organization and backups
- Use hashtags (#project, #meeting) and simple filenames (YYYY-MM-DD-meeting.md) for fast filtering with the built-in search.
- Periodic backup: copy the Notes folder to external storage or a mounted WebDAV/Nextcloud folder; an exported ZIP of the folder is handy for periodic snapshots.
- For sensitive content, place the notes folder inside a vault from a file-encryption tool (e.g., Cryptomator) or rely on system-level file encryption.
- Keyboard and workflow tips
- External keyboard shortcuts work: Ctrl+B (bold), Ctrl+I (italic), Ctrl+K (link) for faster composition.
- Create a small set of personal snippets (common headers, signatures) and paste them from the clipboard manager to save repeated typing.
- Use code fences for snippets:
bash
git status
- When to pick this tool
- Prefer Markor when offline-only access, tiny install size and file portability are priorities.
- Consider a sync-capable alternative if encrypted cloud sync and multi-device automatic syncing are required.
Quick start: create a note and sync later
Create a new note, set its sync mode to “Manual” (or mark as local-only), add a UTC timestamp to the filename like 20260316-1430-meeting. If you beloved this article and also you would like to get more info concerning 1xbet registration promo code kindly visit the webpage. md, then save to the local vault or folder. That guarantees a single-file record that can be synced later with no immediate network activity.
Use plain Markdown (.md) or .txt for maximum searchability and smallest file size; keep individual notes under 200 KB for fast uploads. For metadata, include a small YAML frontmatter:
—
created: 2026-03-16T14:30:00Z
modified: 2026-03-16T14:30:00Z
tags: [project-alpha, inbox]
sync: manual
—
Store inline images in a subfolder (attachments/) and reference them with relative paths: . Resize photos to ~1000 px on the long edge and compress to 300–800 KB before attaching to avoid long sync queues. If a rich capture is required, attach a PDF under 10–20 MB; larger binaries delay subsequent syncs.
When offline editing may collide, enable the app’s conflict policy that creates a conflict copy with timestamp and device name, e.g. meeting-notes-conflict-20260316-1530.md. Resolve by opening both files and using a three-way text merge or copy-paste; preserve the earlier file’s created timestamp in the frontmatter where possible.
Recommended sync settings for deferred uploading: set network to “Wi‑Fi only”, enable “Sync on demand” or “Manual sync” and schedule background attempts at 15–30 minute intervals when charging. If background sync is desired, whitelist the note application in the system battery optimizer to prevent kills during long uploads.
Choose a remote host that matches the privacy model: Nextcloud or WebDAV for self-hosting and folder-level control; Dropbox for reliable delta sync; Google Drive for wide availability. For end-to-end encryption, enable the app’s built-in encryption or use a zero‑knowledge provider; keep the encryption passphrase backed up in a separate password manager–losing it means irretrievable notes.
Batch sync process: group related files into one folder, run a manual “Sync now” when on trusted Wi‑Fi, confirm sync log shows successful PUT/UPLOAD for each file, then check timestamps and frontmatter “modified” values. If transfers fail, retry with exponential backoff (15s, 30s, 60s) or switch to manual export of changed files via the share/export feature.
For quick captures from other applications, use the system share sheet to append content to an existing file or create a new note named with a fast prefix like INBOX-20260316.md. Keep inbox files short; triage them into project folders during the next sync session to maintain a clean folder structure: /notes/2026/03/, /projects/project-alpha/.
- Core capabilities
Android TV No Picture? Top Causes & Quick Fixes
Check power and HDMI first: power off both the display and the source, unplug their power cords for 60 seconds, disconnect HDMI, then reconnect using a known-good cable. Use HDMI 2.0 or higher for 4K@60Hz and a 48 Gbps-rated cable for 4K@120Hz/VRR devices. If you are you looking for more information in regards to 1xbet bonus code have a look at the web site. If the image returns after switching cable or port, replace the faulty cable or avoid the bad HDMI input.
Isolate the fault: connect a different source (laptop, Blu‑ray player, game console) to the same HDMI port and try the original source on a different TV. Approximately 50% of blank-screen incidents trace to cabling, ports or power-supply issues; about 18% are panel/backlight or T‑con related; firmware and OS crashes account for roughly 15%.
If the screen is black but the TV’s menu or status LED works, perform a backlight check: shine a bright flashlight at 10–30 cm from the panel in a dark room – if you see a faint image, the backlight or inverter/T‑con is failing. If no menu is visible at all, suspect the mainboard or power board.
Troubleshoot software: attempt a power cycle (unplug 60 s), then boot into recovery or safe mode per the manufacturer’s procedure; if menus appear, check Settings → System → Update and apply the latest firmware via network or USB. If firmware update stalls, download the official recovery file to a USB stick and follow the vendor’s recovery instructions.
When hardware repair is likely: record model, serial number, purchase date, LED behavior, and results of the alternate-source and flashlight tests before contacting support. Typical out-of-warranty costs: T‑con or mainboard replacement $40–$250, full panel replacement $300–$800. If repair cost approaches replacement price, consider replacing the unit.
Checklist for quick triage: power-cycle both devices, swap HDMI cable and input, test alternate source, perform flashlight backlight check, try firmware recovery, then escalate to model-specific repair or support with documented test results.
Quick initial checks
Power-cycle the display and any external player: unplug mains and any external power brick for 60 seconds, press-and-hold the display’s physical power button for 10–15 seconds to discharge capacitors, then reconnect and power on.
Verify input selection matches the connected source: use the remote’s input/source key to cycle inputs; if the label shows “HDMI 1” but the device is on HDMI 2, switch it.
Inspect and reseat HDMI/AV cables: disconnect both ends, check for bent pins or debris, reconnect firmly until the connector clicks. Replace with a known-good cable (HDMI 2.0+ for 4K signals).
Swap ports and devices: move the same cable to a different HDMI port and connect a different player or laptop. If the alternate device displays normally, the original box or its HDMI output is the likely culprit.
Force a safe resolution/refresh rate on the source device: set output to 1920×1080 @60Hz or 1280×720 @60Hz via the source’s display settings or safe-mode option; many displays will accept those modes when higher resolutions fail.
Backlight check: with the display powered on and room dark, shine a strong flashlight perpendicular to the screen–if faint UI elements or menu outlines are visible, the panel image exists but the backlight/inverter has failed.
Check status LEDs and boot behavior: note LED color and blink pattern during power-on and while connected. A steady red, alternating blink counts, or rapid flashing often map to specific hardware errors–record the pattern and reference the product’s support documentation.
Try a firmware recovery/update route only after confirming basic connections work: if the display shows a boot logo with another input but not from the target player, update the player’s firmware (over network or USB) and reboot both units; do not interrupt a firmware write once started.
Verify TV power indicator and standby state
If the front LED is lit or blinking while the screen stays dark, treat the LED pattern as a diagnostic signal and follow the steps below.
-
Record LED behavior precisely: color, steady vs blinking, blink count and interval, and whether it changes when you press the remote or the set’s physical power button. Log at least 30 seconds of behavior for later lookup.
-
Compare the recorded pattern with the manufacturer’s blink-code table (service manual or support site). Common outcomes:
- Steady amber/red or dim white: deep standby (logic powered, display off).
- Slow repeating blink (1–2 s on/off): sleep timer or network wake enabled.
- Rapid repeated blink or specific n-blink sequences: internal fault flagged by main or power board.
-
Measure standby current using a plug-in power meter: typical modern LED/LCD sets draw <0.5 W in deep standby; sets with network/Wi‑Fi active can draw 1–5 W. Readings consistently above ~10 W indicate a power-supply or peripheral problem.
-
Check standby voltage at the power board only if you can work safely: with the cord plugged in and the set in standby, probe the 5 V standby test point (5 VSB). Expected range: 4.7–5.3 V DC. If 5 VSB is absent, the power module is failing to supply logic power and needs service.
-
Perform a hardware power reset:
- Unplug the mains cord.
- Press and hold the TV’s physical power button for 15–30 seconds to bleed residual charge.
- Wait 60–120 seconds, reconnect mains and turn on using the physical button (not the remote).
-
Differentiate remote/CEC issues from actual standby faults: if the physical button powers the screen but the remote does not, test the remote’s IR/BT transmitter (use a phone camera for IR) and disable HDMI‑CEC devices one at a time. If the set only responds to the remote, inspect receiver/BT modules or paired devices.
-
If LED indicates a firmware update or a stuck boot (long steady white for >120 s with no OSD), leave the set powered for 5–10 minutes to allow the process to finish; if no change, repeat the hardware reset above and try to boot with no USB or HDMI devices attached.
-
When internal inspection is required, disconnect mains before opening the chassis and avoid touching capacitors. If the 5 VSB measures correctly but the display never leaves standby or the board shows fault blink codes, replace the main board or power supply assembly through an authorized service.
-
Smart TV vs Android TV – Which Is Better? Features, Pros & Buying Guide
Recommendation: choose a set running Google’s operating environment if you need the largest app catalog, Chromecast casting, Google Assistant voice control and consistent Play Store access; opt for a maker’s native interface when you want a simpler menu, lower entry price or deeper hardware-specific tunings. If you liked this article and you also would like to be given more info with regards to 1xbet apk download latest version kindly visit our own page. Typical midrange devices with Google’s software ship with 2–4 GB RAM and quad-core SoCs; flagship boxes and sets push to 4–8 GB plus faster GPUs and dedicated decoders – pick higher memory and a 64-bit SoC for smooth app multitasking and game streaming.
Google’s platform advantage: direct access to Google Play (thousands of streaming and utility apps), built-in casting, integrated voice assistant and wider support for third-party peripherals. Expect system updates and security patches more frequently from the platform provider, though manufacturer rollout timing varies by brand. Hardware-dependent capabilities such as Dolby Vision, HDR10+ and Dolby Atmos require both OS support and panel/AV-chip compatibility; verify HDR formats and audio passthrough on the product page before purchase.
Manufacturer interfaces excel at streamlined navigation, manufacturer-specific remote features and sometimes exclusive content or free linear channels. Brands often tune motion handling, local dimming and tuner performance for live TV; this can yield lower input lag and faster channel changes on some models. For lightweight boxes focused on simplicity and broad channel support, consider Roku or proprietary UIs from major panel makers that prioritize stability over customization.
Practical selection checklist: for gamers look for HDMI 2.1, 4K@120Hz support, VRR and ALLM with input lag under 10 ms at 60 Hz; for movie enthusiasts prioritize peak brightness (aim > 1000 nits for HDR highlights), local dimming zones, and hardware passthrough for Atmos and advanced HDR; for cord-cutters verify app availability for local services, tuner support and reliable over-the-air recording. If longevity matters, favor devices with clear update policies and a large app ecosystem rather than closed, low-cost platforms.
Key OS and Platform Differences
Pick a set running Google’s platform if you need the broadest app selection, native casting, and frequent Play Services updates; choose a manufacturer or third-party platform for a simpler interface and vendor-specific integrations.
App ecosystems differ by distribution model: Google’s platform uses the Play Store with many large-screen ports and third-party sideloading options; Roku, webOS, Tizen and Fire OS use curated stores with stricter certification, which means some niche apps or beta builds may be absent. Before purchase, confirm availability of your subscription services and regional app variants.
Update cadence and lifecycle vary: devices on Google’s platform typically receive Play Services and security patches monthly or quarterly from Google plus occasional firmware updates from the maker. Manufacturer platforms often publish irregular firmware schedules. Seek devices that promise at least two years of major updates and three years of security fixes, and verify that commitment in vendor documentation.
Content protection determines true playback quality. For HD/4K DRM playback you need platform support for Widevine L1, PlayReady or vendor-equivalent CDMs plus proper vendor certification for apps like Netflix and Amazon Prime. Check DRM level and confirmed 4K support for each streaming app rather than assuming high resolution is available on all sets.
Casting and screen-mirroring differ: Google’s platform includes Chromecast built-in and deep Google Assistant integration; other platforms may offer AirPlay, Miracast or Alexa support. Match the platform to your existing smart-home ecosystem to avoid adapter devices and to enable multiroom or voice routines.
Sideloading and developer access: AOSP-derived builds and Google’s platform allow easier sideloading and debugging, useful for advanced users and hobbyist apps. Roku and many manufacturer stores are closed by design; Fire OS permits sideloading but may lack Google Play compatibility. If you plan to run custom apps, prioritize platforms that document developer APIs and permit non-store installs.
Performance depends on both OS efficiency and hardware: low-end sets with 1–2 GB RAM and 8 GB flash will struggle with multiple background apps and 4K decoding. Target devices with 3–4 GB RAM and 16 GB flash for smooth navigation and app updates; for heavy multitasking or local media servers, prefer quad-core SoCs with dedicated video decoders (HEVC/VP9/AV1 where needed).
Remote and search behavior: platforms vary in universal search and voice results aggregation. Google’s platform and Roku offer cross-app universal search; some manufacturer shells limit search to preinstalled partners. If quick universal search and voice shortcuts matter, test the remote and search behavior in-store or via online demos.
Checklist before purchase: confirm required apps and their 4K/DRM status; verify vendor update policy and promised support years; check which casting/assistant ecosystem is native; ensure hardware minimums (3–4 GB RAM, 16 GB storage for 4K use); and decide whether you need sideloading or a closed, curated experience.
Core operating system architecture explained
Recommendation: choose a device whose platform uses a modern LTS Linux kernel (>=5.10; 6.1 LTS preferred), strict SELinux enforcement, a vendor HAL/API separation, verified A/B updates with rollback protection, and hardware-backed DRM/key storage.
The kernel provides process scheduling, memory management, device drivers and the graphics/voideo stacks (DRM/KMS). Verify whether GPU and video codecs are supported by mainline drivers or by out-of-tree blobs; mainline drivers and upstreamed kernel backports reduce long-term compatibility issues.
Hardware abstraction layers (HAL) or well-documented vendor APIs must isolate OEM-specific code from the platform framework. A clear HAL boundary lets the platform maintain API stability while vendors supply drivers and hardware features without forcing app rewrites.
Application runtime usually combines a managed runtime (JIT/AOT-capable VM) and native libraries. Look for per-app sandboxing, namespace isolation, seccomp filters and per-app user IDs to reduce privilege escalation risk and to contain misbehaving packages.
Media pipeline architecture: hardware video decoders (H.264/H.265/AV1), proper V4L2/DRM integration, audio routing (ALSA/pipewire/pulse equivalents), HDR metadata handling and HDMI-CEC/HDCP support are implemented at the kernel+middleware boundary. Confirm supported codec profiles, container formats and DRM levels (Widevine L1 / PlayReady equivalents) for streaming quality and protected playback.
Update and signing model matters for reliability: A/B (seamless) updates with delta transfers, signed images and verified boot reduce brick risk and allow safe rollbacks. Check the vendor’s published update cadence and whether security patches are backported into the shipped kernel.
Security hardware: secure boot chain, Trusted Execution Environment (TEE) or secure element for key storage, and runtime attestation improve content protection and credential safety. Ensure attestation and key escrow policies are documented and controllable by the end user.
Compositor and input stack design affect responsiveness and latency. Prefer compositors that use hardware overlays, vsync-driven composition and GPU-accelerated rendering; this lowers frame drops, reduces input lag for remotes/game controllers and lowers CPU load.
Resource management: cgroups v2, a modern scheduler, and a robust low-memory handling policy determine multitasking behavior. For comfortable multitasking and background app retention choose devices with at least 2–3 GB RAM and an OS that exposes predictable background limits.
Telemetry, preinstalled services and update control should be explicit: platforms that separate vendor apps from core system services and that permit disabling data collection offer clearer privacy and easier troubleshooting. Verify available settings and any mandatory cloud services before purchase.
Redmi 9 Android Version – What Android Does the Redmi 9 Run?
Recommendation: If security patches and app compatibility matter, install MIUI 12.5 (Google mobile OS 11) when an official OTA appears. Verify availability via Settings > About phone > System update and perform a full backup before applying any update.
To confirm current software state, open Settings > About phone and read MIUI build string plus security patch date. If build shows 2020 or early-2021 patch level, prioritize update or download incremental OTA from Xiaomi support pages for a safer install.
Advanced option: Community-maintained releases such as LineageOS can offer later Google mobile OS iterations (11 or 12) for select Xiaomi 9 variants. Bootloader unlock and custom recovery installation are required; expect data loss and warranty voiding. Follow device-specific forum threads for compatible builds, required kernel patches, and step-by-step flashing guides.
Support summary: one major official OS upgrade (10→11) plus limited security updates is typical for this budget-class model. For longer-term platform support, choose a maintained custom release or upgrade to a newer handset with multi-year update commitments.
Factory Android Version on Redmi 9
Shipped with MIUI 11 built on v10 (API 29). Recommended action: install official OTA before adding accounts or unlocking bootloader.
- Confirm factory firmware: open Settings > About phone > MIUI build, Base OS and Security patch; note build number for support queries.
- Verify retail box sticker and IMEI label for stated MIUI release and base OS numeral; match those values with device About screen prior to manual flashing.
- Check bootloader state via fastboot (power + volume down). Bootloader status determines whether fastboot ROM or recovery ROM is required for restoration.
- Use ADB for quick inspection (device must be authorized): run adb devices then adb shell getprop | grep -i “release\|security” to reveal base release and patch date.
- Restore stock firmware using official fastboot package with Mi Flash in clean-all mode; unlock bootloader first via official Mi Unlock. Flashing will erase user data – backup beforehand.
- If bootloader remains locked, apply official recovery (local) update: move official recovery package to device storage and use Updater app’s “Choose update package” option to install without unlocking.
- Always flash only packages that exactly match model code and region. Mismatched fastboot ROMs can brick device.
- When warranty retention is required, prefer OTA or recovery local update instead of unlocking or third-party builds.
Check Security patch date in About phone and keep it current; when official major update appears for specific model, prefer OTA or official fastboot package from vendor servers.
Original Android base at launch
Use stock AOSP 10 (API level 29) build shipped on this handset for uninterrupted official OTA support; install MIUI 12.0.1 or 12.0.2 update and initial security patch (June 2020) before unlocking bootloader.
Launch base details: AOSP 10 (API 29) core, MIUI 12 skin, vendor kernel compiled from Linux 4.19 sources (some regional ROMs used 4.14). Partition map: boot, recovery, system, vendor, userdata, odm, product, vbmeta, persist. Firmware filenames in stock ROM packages typically include: payload.bin, system.img, boot.img, recovery.img, vbmeta.img.
Recommended maintenance steps: keep stock OTA until full backup created; unlock via official bootloader unlock tool, obtain latest fastboot and SP Flash Tool builds; use TWRP image matching kernel and chipset before flashing custom builds. For flashing via fastboot, preserve vbmeta unless flashing signed images; if disabling dm-verity and verity verification required, pass appropriate fastboot flags and flash vbmeta with –disable-verity –disable-verification.
Upgrade options: official MIUI 12.5 and MIUI 13 OTAs (where released) provide incremental UI refinements atop original AOSP 10 base; community ROMs based on AOSP 11 (API 30) or AOSP 12 (API 31) exist for Helio G80 chipset – choose builds with active maintainers, recent security patch levels, and verified boot compatibility. Always verify device codename, bootloader status, and compatibility with vendor blobs before flashing.
Security note: initial security patch date: 2020-06. If you have any sort of questions concerning where and ways to use 1x bet app, you can call us at the web page. For long-term patching, rely on maintained custom projects and verify cryptographic signatures of downloaded images. Keep backups of EFS/NVRAM-like partitions where present.