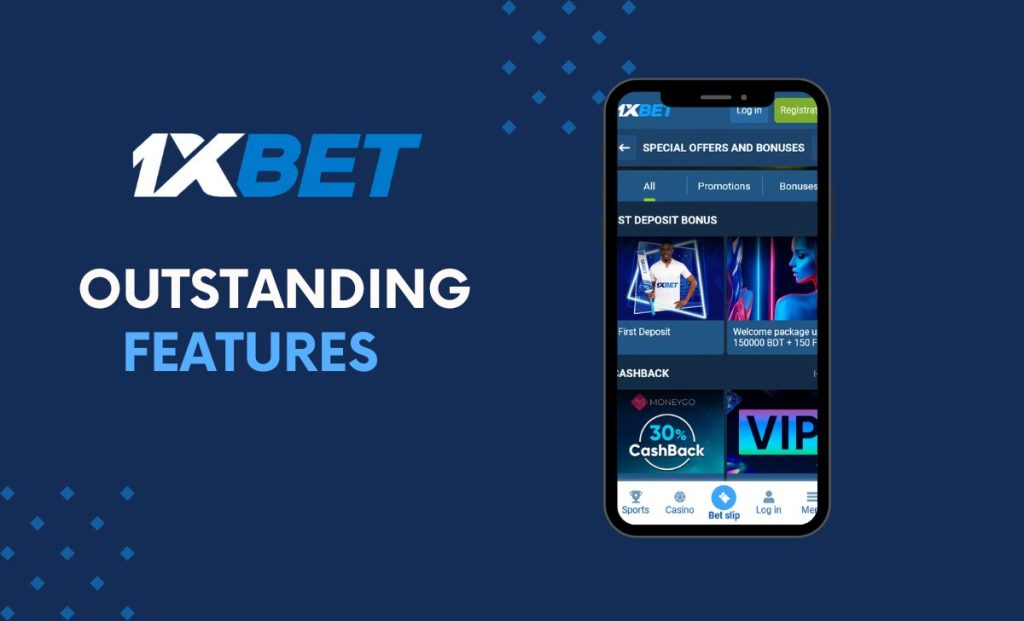
When Did Android First Appear? Release Year, History & Timeline
Answer / recommendation: Cite September 23, 2008 as the platform 1.0 public-build date; the initial consumer handset (HTC Dream, marketed as the T‑Mobile G1) reached retail in October 2008 (U. If you liked this write-up and you would like to get additional data regarding 1xbet app kindly check out the web-site. S. availability commonly listed as October 22, 2008). Use these two dates for a concise public-launch reference.
Core milestones to include in any concise overview: company founded in October 2003 by Andy Rubin, Rich Miner, Nick Sears and Chris White; acquisition by Google in August 2005 (commonly cited date: August 17, 2005); public unveiling with the Open Handset Alliance on November 5, 2007; platform 1.0 finalized September 23, 2008 and the first retail handset shipped in October 2008.
Research tip: when documenting the platform’s evolution, reference build numbers and API levels (API level 1 corresponds to the initial 1.0 build) and prefer primary sources – Google’s press statements from November 2007 and late‑2008 handset launch pages – for exact wording and context.
Quick note on citations: for a single, citable date use September 23, 2008 for the public platform build and October 22, 2008 for mainstream U.S. handset availability; expand with the 2003 founding and 2005 acquisition entries for background depth.
Origins: Android’s First Conception
Obtain primary-source materials immediately: founders’ interviews, Google’s acquisition press statement (Aug 17, 2005), USPTO filings from 2003–2006, and Wayback captures of the original developer portal.
- Founding team: Andy Rubin (founder/lead), Rich Miner (co-founder), Nick Sears (business development), Chris White (UI/engineer).
- Company formation: Oct 2003, Palo Alto; initial product concept targeted handheld consumer devices, with internal shift toward mobile handsets by 2004.
- Corporate transition: Google acquired the startup in Aug 2005 for a reported ~ $50 million; acquisition documents and contemporaneous press coverage reveal strategic motives.
- Design architecture: Linux kernel as the base, Java-like APIs for application development, and a register-based virtual machine (Dalvik) created to meet mid-2000s mobile memory and CPU constraints.
- Industry coordination: Open Handset Alliance announced Nov 5, 2007, assembling handset makers and carriers to support the platform and a common SDK.
Recommended research actions:
- Download Google’s Aug 17, 2005 acquisition press release and compare quoted objectives with later technical roadmaps.
- Search USPTO for patent applications filed 2003–2006 by Rubin and colleagues; focus on mobile middleware, power management, and VM techniques.
- Pull AOSP commit logs and initial SDK snapshots from late 2007 to identify kernel version, subsystem additions, and boot sequence changes.
- Review technical talks and interviews by Dalvik contributors (Dan Bornstein and peers) for rationale behind register-based VM choices and garbage-collection trade-offs.
- Archive-check early product marketing and developer guides (Wayback snapshots from 2007–2008) to reconstruct API promises versus implemented features.
Key milestone dates (concise):
- Oct 2003 – company formation in Silicon Valley.
- Aug 17, 2005 – acquisition by Google announced.
- Nov 5, 2007 – Open Handset Alliance formation; public SDK availability begins.
- Oct 2008 – first commercial handset (HTC Dream / T-Mobile G1) reached market.
Practical tips for archival accuracy:
- Prefer contemporaneous press clips and SEC/press archives over retrospective interviews for causal claims.
- Correlate commit timestamps with press announcements to avoid retroactive attribution of features.
- Use Git blame on early AOSP repos to attribute authorship of major subsystems and to map design intent to individual contributors.
Founding date of Android, Inc.
Founded on October 22, 2003, the company was incorporated in Palo Alto, California by Andy Rubin, Rich Miner, Nick Sears and Chris White.
Verify the record by consulting California Secretary of State business filings: search the corporate registration entry for the exact incorporation date, registered agent and filing number; save a PDF copy of the official certificate as a primary source citation.
Confirm secondary corroboration with contemporaneous press reports and the acquiring firm’s announcement: Google completed the acquisition on August 17, 2005 (commonly reported purchase consideration ~US$50 million), which provides an external timestamp linking early operations to broader corporate actions.
Recommended documentary sources to cite directly: California SOS incorporation record; the acquiring company’s press release of 17 August 2005; relevant SEC filings and S-1 exhibits mentioning the deal; founder interviews and tech-press coverage from 2003–2005 archived via reputable outlets or the Wayback Machine.
Lightweight Android Emulators — Best Fast, Low-RAM Options 2026
Recommendation: run a container-based runtime such as Waydroid or Anbox-ng for the lowest sustained memory use: configure the guest at 512 MB RAM, keep host overhead around 300–700 MB, and avoid Google services to shave another 150–300 MB. If you have any queries pertaining to exactly where and how to use 1xbet promo code philippines, you can contact us at our internet site. Waydroid requires kernel support for ashmem and binder but gives the best balance of startup time and ongoing memory tax on Linux desktops and laptops.
If you need a Windows-compatible approach without overcommitting local RAM, pick a cloud-hosted virtual device (Genymotion Cloud or similar): provision a remote instance with 1 vCPU / 1–2 GB RAM, run the UI stream in your browser, and keep your machine free from heavy background processes. For fully local VMs, use x86 system images in VirtualBox/VMware and allocate 1 GB (minimum) and 8 GB disk; avoid ARM images to eliminate CPU translation layers that add both latency and memory overhead.
Practical tuning checklist: enable KVM/hypervisor support on hosts with virtualization, set swap = 1–1.5× RAM when under 8 GB, disable Play Store and background syncing, uninstall unnecessary system apps, and prefer emulated graphics over full GPU passthrough on constrained machines. Use adb to push only the APKs you need and run headless instances for automated testing to reduce UI-related RAM usage.
For quick decisions: choose container runtimes on Linux for the smallest persistent footprint; choose cloud instances to offload memory pressure from the host; choose local x86 virtual machines when compatibility (native libraries, debugging tools) is required but budget at least 1–2 GB per instance.
When to choose a lightweight Android emulator
Use a compact virtual device when host resources are constrained (≤8 GB RAM or ≤4 logical cores), you need rapid smoke checks, or you must run multiple instances in CI without dedicated build agents.
- Hardware thresholds:
- Host RAM ≤8 GB: allocate 1.5–2 GB RAM per VM; reserve 1.5–2 GB for the OS. Example: three concurrent instances → 3×2 GB + 2 GB OS ≈ 8 GB total.
- CPU: 1 vCPU per instance is adequate for UI smoke tests; 2 vCPUs if the app performs background processing. Avoid running software-only virtualization on single-core machines (performance penalty ≈ 3–10×).
- Disk: plan 8–12 GB image size per instance; store images on SSD to avoid 3–5× longer boot times on HDD.
- Continuous integration / parallel testing:
- Prefer headless images that support snapshot boot to cut cold startup from tens of seconds to 2–8 seconds.
- For parallel matrix (API levels × densities), limit parallel image types to reduce disk I/O; reuse a snapshot for identical configurations.
- Allocate 2 GB RAM and 1 vCPU per parallel job as a baseline; scale host resources linearly.
- Quick verification and lightweight QA:
- Choose images without bundled Play services or heavy frameworks when you only need installation, basic UI interaction, or intent handling tests; these images use ~30–50% less memory.
- Lower framebuffer resolution (480×800) and disable GPU acceleration to reduce CPU load and battery draw on laptops by ~10–25%.
- When not to pick a compact instance:
- Performance profiling, GPU-heavy graphics, AR/VR, and intensive sensor simulations – use full-featured images or physical hardware.
- Apps requiring Play services or Google APIs often behave differently on stripped-down images; use a full image for compatibility tests.
- Devices without virtualization support (no VT-x/AMD‑V) – software emulation will be prohibitively slow; connect a real device instead.
- Practical setup tips:
- Enable host hardware virtualization (KVM, Hyper-V, Intel HAXM) to reduce CPU usage by 40–70% compared with software emulation.
- Use snapshots and fast SSD storage to shrink iteration loops; keep a “clean” snapshot per API level.
- Limit background services on the host during parallel runs to preserve I/O and CPU headroom.
Run simple apps on 4GB laptops
Recommendation: allocate 1.0–1.5 GB RAM to the guest app runtime, keep at least 2.0–2.2 GB for the host, assign a single physical CPU core (or one vCPU) and use an x86/x64 guest image to avoid ARM translation overhead.
Enable hardware virtualization (VT-x / AMD‑V) in firmware. Use GPU acceleration with OpenGL ES or ANGLE backends rather than software rendering; set the guest display to 720p or lower and reduce DPI to 160–240 to cut VRAM and CPU use.
On the host, create a 1–2 GB swap file or enable zram (Linux) sized to ~1.0–1.5 GB to prevent OOM kills. Prefer an SSD; on HDD systems keep swap usage minimal to avoid stuttering. Close background sync, heavy antiviruses, and nonessential browser tabs before launching the runtime.
Install x86/x64 builds of apps when available; ARM-only packages trigger emulation and multiply CPU + RAM needs. Use stripped APKs or progressive web apps (PWAs) for messaging, calculators, notes and other simple utilities to avoid the full runtime overhead.
Storage: allocate a 4–8 GB sparse image and disable snapshotting. Disable unneeded services inside the guest (auto-updates, app store background checks, accessibility services). In developer options set background process limit to 1–2 processes and turn off animations (0.5x or off) to reduce rendering load.
Network & peripherals: turn off GPS, camera and microphone passthrough unless required. Limit shared folders and real-time antivirus scanning of the guest image to reduce I/O spikes.
If the host is Windows, switch to the High Performance power plan and use lightweight host shells (disable visual effects). On Linux, prefer a minimal desktop (XFCE, LXQt) or run headless with an X/Wayland client to save ~200–400 MB RAM.
Quick checklist: enable VT; choose x86 guest images; set guest RAM to 1–1.5 GB; add 1 GB zram or swap; lower resolution to 720p; disable background services and animations; prefer PWAs or x86 APKs.
- Hardware thresholds:
Redmi Note 8 Pro Android Version – What Android Does It Run & Update Guide
Recommendation: Keep this 2019 midrange Xiaomi on MIUI builds based on AOSP 10 (API 29) for the best official security and app compatibility; obtain monthly security patches from Xiaomi via Settings → About phone → Check for system packages, and do a full backup before any firmware change. If you cherished this short article in addition to you would like to be given more information relating to 1xbet philippines download i implore you to stop by our page. Avoid unofficial releases unless you can restore the stock image and have a tested recovery workflow.
Factory software shipped as MIUI 10 on AOSP 9 (API 28); official major platform support for global variants reached AOSP 10 (API 29) through subsequent MIUI updates. Many later MIUI feature builds (12 / 12.5) remained on that platform level, so expect official upgrades to stop at API 29 for most channels.
Safe upgrade steps: 1) verify exact model and regional codename in Settings → About; 2) create a full backup (local + adb pull + cloud); 3) ensure battery ≥ 60% and stable Wi‑Fi; 4) use the official recovery package with the built‑in Updater app or flash the fastboot ROM with MiFlash for Xiaomi fastboot variants; 5) for MediaTek variants use SP Flash Tool and the correct scatter file. Unlocking the bootloader will factory‑reset the device, so export accounts and keys beforehand.
For later platform builds beyond official support, prefer community ROMs with active maintainers (check XDA/Telegram threads), validated boot images and tracked changelogs. Required steps for custom firmware: unlock bootloader, flash a matching TWRP, make a full Nandroid backup, flash the chosen ROM + GApps separately, then test core functions (radio, camera, biometric). Keep original stock firmware and vendor blobs available for rollback.
Current Android version shipped with Redmi Note 8 Pro
Ships with Pie (9) out of the box paired with MIUI 10; an official upgrade to 10 was delivered in 2020, while no official upgrade to 11 was issued by the manufacturer – later releases require third‑party builds.
- Launch OS base: Pie (9).
- Stock skin at release: MIUI 10 (global/stable variations depending on region).
- Highest official OS base provided: 10 (Q) via OTA in 2020.
- Security updates continued after initial release; verify the “Security patch level” entry in Settings for current status.
- Check current base: Settings → About phone → Software information → look for OS base name (Pie/10) and MIUI build.
- Before applying OTA: back up user data (local + cloud), ensure battery ≥ 50%, and connect to stable Wi‑Fi.
- Apply updates only from the built‑in updater or the official regional ROM packages to avoid mismatched firmware that can brick the device.
- Do not flash unrelated region images; confirm whether the build is “global”, “eu” or “china” for compatibility with network bands and services.
- If you opt for a custom release (to obtain OS 11+), unlock the bootloader first, follow device‑specific instructions, and accept that camera performance and OTA support may differ from stock.
- If your goal is security patches and stable behavior, use official OTAs only.
- If you need a newer OS base beyond the official 10, research maintained community builds (LineageOS, Pixel‑style ROMs) and read changelogs for camera, modem and SELinux status before flashing.
Stock Android version and corresponding MIUI build
Use stable MIUI builds that match the phone’s platform API level; do not flash ROMs whose base platform (API) is higher or lower than the device currently reports. If you want maximum stability, pick the latest stable MIUI release whose base platform equals the device’s reported API level.
Check exact identifiers before any change: via ADB or a terminal app run getprop ro.miui.ui.version.name (MIUI major), getprop ro.build.version.sdk (API level), getprop ro.build.version.release (OS release number), and getprop ro.product.device (device codename). Example commands: adb shell getprop ro.miui.ui.version.name ; adb shell getprop ro.build.version.sdk ; adb shell getprop ro.product.device.
Typical mapping to use when comparing builds: MIUI 10 builds are commonly based on API 28 (Pie). MIUI 11 builds map to API 29 (10). MIUI 12 and 12.5 builds land on API 29–30 (10 or 11) depending on the specific ROM release. Use the API number, not only the MIUI label, to determine compatibility.
MIUI build strings follow this pattern: MIUI_x.y.z.z.. Example: MIUI 12.0.1.0.PGGMIXM – MIUI 12.0.1.0 (MIUI major/minor), PGG = device code segment, MI = global region. Region suffixes you’ll see most often: CN (China), IN (India), EU (Europe), RU (Russia), MI (global). Match the region and device codename when downloading stable/fastboot ROMs.
Before flashing, verify three values match the ROM file: MIUI major (getprop ro.miui.ui.version.name), API level (getprop ro.build.version.sdk), and device codename (getprop ro.product.device). For a clean, consistent result prefer the fastboot ROM that exactly lists the same device codename and region; use recovery ROMs only if they explicitly list compatibility with the current MIUI build family.
If the bootloader is locked, do not flash fastboot ROMs from other regions – use official recovery updates or unlock the bootloader via the vendor’s approved method first. Always export a full backup and note the security patch date from getprop ro.build.version.security_patch before proceeding.
Realme 5 Pro Android Version – Current OS & Update Info
Check model and build: open Settings > About phone; note the model (RMX1971), the build number and the security patch date (format YYYY-MM-DD). If the security patch is older than 2022-01-01, plan to install a newer official release or a maintained custom build. Ensure at least 3 GB free storage and a battery charge above 50% before proceeding.
Obtain and verify firmware: download the exact firmware package for RMX1971 from the manufacturer’s support portal. Verify the file integrity using SHA256 or MD5 checksum published on the download page (example command: sha256sum RMX1971_firmware.zip). Prefer packages that include a visible security patch date and a signed build string in the filename.
Safe installation steps: enable USB debugging, create a local backup (Settings > Backup & restore or use adb pull for critical folders), boot into recovery or use the vendor flashing tool. For sideloading via ADB use: adb sideload RMX1971_firmware.zip. Reboot and confirm the build number and patch date match the downloaded package.
If you choose custom firmware: verify the device codename matches RMX1971, unlock the bootloader only after understanding warranty implications, install a compatible recovery (TWRP), and flash a signed custom ROM built for that codename. If you cherished this article and you simply would like to collect more info with regards to 1xbet login download please visit the webpage. Keep copies of original stock firmware to revert if necessary.
Risk management: flashing mismatched region builds or incorrect images can brick the handset; double-check model string, checksum and vendor notes. Keep a note of the original IMEI/serial (Settings > About phone) and perform a factory backup so data can be restored if an upgrade path fails.
Current Android Version on Realme 5 Pro
Install the latest stable operating-system build available for model RMX1971: the last official major release is 11 (manufacturer skin 2.0); there is no sanctioned upgrade path to release 12 from the maker.
Verify installed software: Settings → About phone → Software information. Check the “OS build” or “Base OS” entry for the numeric release (11) and note the security patch date; confirm the model reads RMX1971 to avoid flashing wrong files.
Pre-upgrade checklist: full backup of user data, battery at least 50% (preferably 80%), reliable Wi‑Fi, and minimum 3–5 GB free internal storage. Prefer official over-the-air or full ROM packages from the vendor support page; validate any downloaded package with the provided checksum before installation.
Recommended installation paths: use Settings → Software upgrade → Local upgrade with the official full package placed in device storage, or perform ADB sideload from a PC (adb sideload ) when guided by official instructions. Avoid unofficial builds unless you can restore Nandroid backups and accept warranty/bootloader consequences.
Troubleshooting: for boot issues, boot to recovery (Power + Volume keys) and try cache wipe, then factory reset only if necessary. If manual flashing fails, restore the verified full ROM via recovery or fastboot using official tools and factory images distributed on the vendor site.
Factory Android and UI shipped
Keep the stock firmware (ColorOS 6 running on 9 (Pie)) if you prefer the vendor-validated experience; only move to custom builds after a full backup and a deliberate bootloader unlock that you understand may trigger a factory reset and affect warranty terms.
The handset model RMX1971 left the factory with the ColorOS 6 skin delivering: Smart Sidebar, Game Space, App Cloner (dual apps), gesture-based navigation, built-in theme store, system-level dark elements, and camera features such as AI scene recognition and Nightscape mode. System resources were tuned for smooth UI animations and background app restrictions appropriate for midrange hardware of the release year.
To remove unwanted preinstalled packages, use Settings → Apps to uninstall or disable where allowed; revoke unnecessary autostart permissions and restrict background activity per-app to reduce wakelocks and improve battery life. For temporary testing, create a full nandroid or adb backup before disabling core system packages.
To confirm factory firmware details, open Settings → About phone → Build number / Software information and record the complete build string and model code (RMX1971). Download official factory firmware only from the manufacturer’s support portal using that model code and follow the vendor instructions for local installation or recovery flashing; flashing improper images risks bootloops.
Before flashing any third-party system image: back up media and app data, export SMS/contacts, enable OEM unlocking in Developer options if required, and verify the custom image’s compatibility with RMX1971 (camera modules, modem blobs). If stability or connectivity regressions appear after modifications, restore the original factory image from the official package to return to the certified baseline.