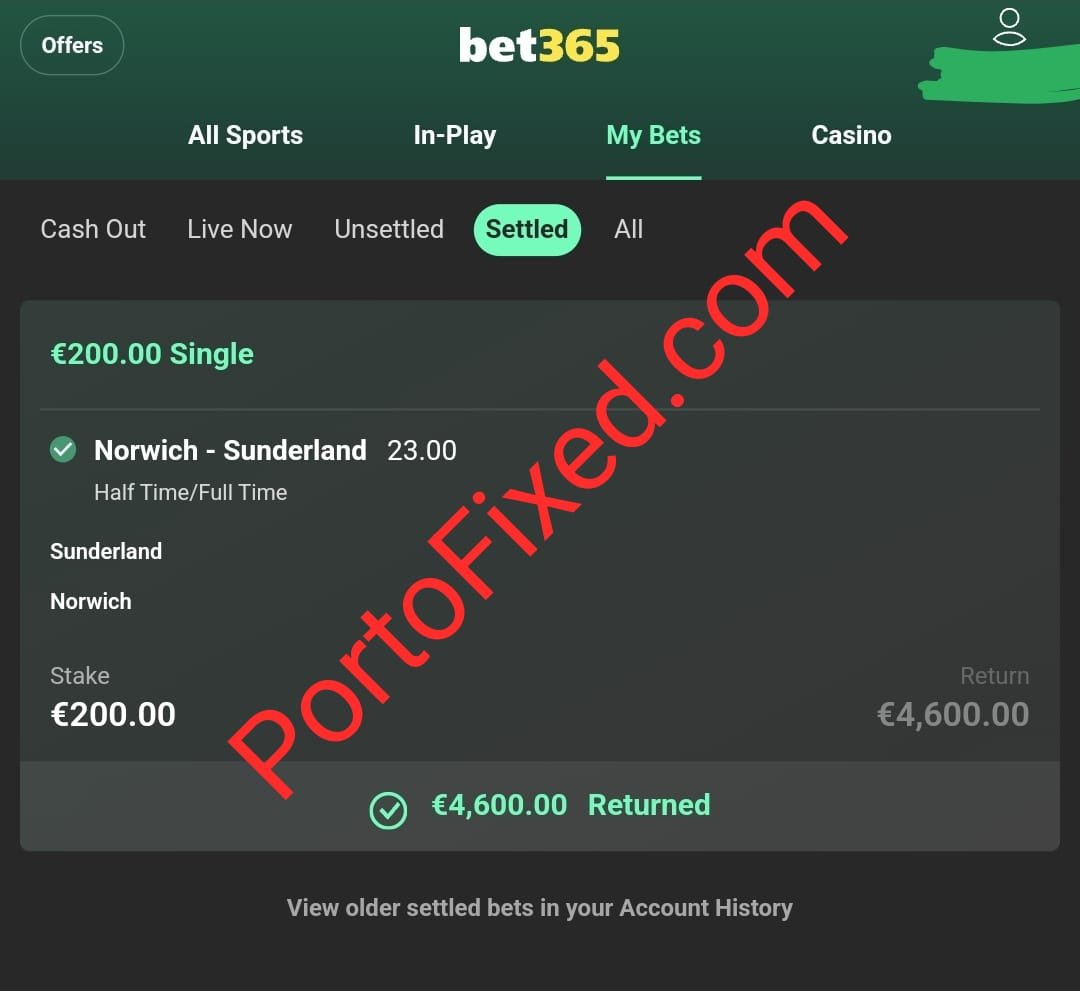
Samsung Galaxy M20 Android Version — What Android Does It Run?

This 2019 midrange handset from a South Korean OEM debuted with Oreo 8.1 (API level 27). The vendor issued successive official builds: Pie 9.0 (API 28) and a final major release labeled 10 paired with One UI 2 / One UI Core 2.0. Official major-release support stops at 10; further feature releases were not provided for this model.
How to confirm your current build: open Settings > About phone > Software information and check the release name and numeric level (8.1, 9, 10) plus the security patch date. Those entries tell you which platform release and monthly patch you are running.
If you need features from later platform releases: either migrate to a newer handset with official updates or consider a community-maintained firmware (for example, LineageOS builds that map to releases 11/12). Before attempting any aftermarket install, back up user data, verify bootloader unlock options for your exact model, follow device-specific threads on developer forums, and use verified recovery/installation guides to avoid bricking.
Official Android Versions for the Galaxy M20
Install the official update to Google platform 10 (One UI 2.0) – this is the final major firmware release delivered for this model; subsequent deliveries were limited to security patches and bug fixes only.
Factory firmware on launch was Google platform 8.1 (Oreo). The unit then received a major upgrade to platform 9 (Pie) with One UI 1.x, followed by the upgrade to platform 10 (One UI 2.0). No further manufacturer-issued major platform upgrades were released after platform 10.
To verify your current build: open Settings > About phone > Software information for platform level and build number. For over-the-air checks use Settings > Software update > Download and install. Always back up user data, connect to a stable Wi‑Fi network and ensure battery is above 50% before applying system updates.
Rollouts were region- and carrier-dependent; firmware identifiers differ by market. When searching official firmware files or support pages, match the handset’s exact model code (SM-M205xx series) and CSC/region tag to avoid installing an incompatible build.
If you require a newer major platform beyond the last official release, consider community builds (LineageOS and similar) only after confirming device support, required bootloader unlock procedure and trade-offs: loss of official support, potential instability in modem/camera functions and security implications.
Original Android release and One UI baseline
Recommendation: keep the handset on the stock 8.1 (Oreo) build and the initial One UI Core 1.0 baseline for daily use unless you require features from an official major upgrade; install only OTA packages from the device maker and apply security patches as they arrive.
Launch specifics:
- Initial OS at launch: 8.1 (Oreo).
- UI baseline shipped: One UI Core 1.0 (the lighter firmware tier used on budget models).
- Initial security patch window: January–February 2019 builds on most units out of the box.
What the baseline means for the device:
- Feature set: pared-down One UI components (Core), limited Samsung-specific apps and services compared with flagship releases.
- Update path: major platform upgrades replace the baseline UI with newer One UI branches (e.g. If you adored this information and you would certainly like to get additional facts pertaining to 1xbet promo code free spins kindly see our own web site. , One UI 1.x → 2.x) tied to newer OS major releases.
- Performance profile: tuned for the Exynos/SoC and RAM configurations used at launch; aftermarket firmware can change CPU governor and memory management behavior.
Practical checks and recommendations before upgrading or modifying firmware:
- Verify current build: Settings → About phone → Software information – confirm OS build number, One UI label, and security patch date.
- Backup: full backup (internal storage + cloud + app data via developer tools) before any OTA or manual flash.
- Battery and connection: ensure ≥50% charge and stable Wi‑Fi for OTA; prefer official update server to minimize failed installs.
- Custom firmware caution: unlocking bootloader or installing third‑party ROMs voids warranty, may disable security features (e.g., Knox), and can block future official OTAs.
- Downgrade risk: rolling back to an earlier major branch is often unsupported and can brick the device if bootloader/partition layouts changed by newer firmware.
- Check current software info and security patch level.
- Create a complete backup (local + cloud).
- Confirm official OTA availability via the maker’s support channels or the device’s Settings → System → Software update.
- Apply update on stable power and network; monitor first boot for app re-optimizations and permission resets.
- If considering custom ROMs, research device-specific threads for known issues, required bootloader steps, and available recovery images.
How to Root Android – Safe Step-by-Step Guide 2026
Immediate recommendation: create a full device image with a custom recovery (for example TWRP), copy the NANDroid archive to your PC and verify integrity with SHA256 checksums before any modifications. Keep battery level above 80% and use a high-quality USB cable; interrupted flashing frequently causes permanent failure.
Enable Developer options, toggle the OEM setting that permits bootloader modification and enable USB debugging. Confirm exact model and build with adb shell getprop ro.product.model and adb shell getprop ro. If you liked this write-up and you would such as to get even more information concerning download 1xbet app kindly check out our web site. build.fingerprint. Reboot to bootloader with adb reboot bootloader and check bootloader state via fastboot oem device-info. Expect a complete data wipe when bootloader modifications are applied.
Install official platform tools (adb/fastboot) on your computer. Download the device-specific custom recovery image from the official source (twrp.me) and verify its checksum. Flash recovery with fastboot (example): fastboot flash recovery twrp-3.x.x-x-device.img. Use the recovery to flash a systemless manager ZIP (Magisk); download the matching APK for post-install management and confirm ZIP integrity before flashing.
Caveats: applying elevated-privilege modifications can void warranty, break OTA updates and trigger verified-boot protections. Keep the full backup and the stock firmware image ready for restoration. After installing the manager, verify elevated access by opening adb shell and running su -c id (or checking which su and confirming id returns uid=0). If the device fails to boot, restore the NANDroid archive from recovery or reflash stock firmware.
Prepare your device and environment
Charge the battery to at least 80% and keep the device plugged into a stable power source during all flashing steps; a mid-process shutdown will likely brick the unit.
Create three independent backups: copy DCIM/Downloads via MTP to a PC, export contacts to a .vcf and messages using a trusted SMS export app, and export any app-specific data (use the app’s built-in export or adb pull /data/data/ if you have prior root-level access). Treat a factory reset as inevitable when unlocking the bootloader.
Remove all linked accounts that trigger activation locks: Settings → Accounts → remove Google/brand account entries; verify FRP lock is cleared by booting to recovery after removing accounts.

Enable Developer options and debugging: Settings → About → tap Build number seven times; then open Developer options and toggle ON USB debugging and OEM unlocking (if present). Note: some carriers/models hide OEM unlock behind carrier locks or require a vendor unlock token.
Record device identifiers before any modification: run adb shell getprop ro.product.model, adb shell getprop ro.build.fingerprint, adb shell getprop ro.bootloader and write down Model, Variant, Baseband, Bootloader version and Build ID. Save this text file with timestamps for recovery reference.
Install official platform-tools from the vendor (Google’s package for fastboot/adb). Verify the archive checksum: on macOS/Linux use sha256sum .zip; on Windows use CertUtil -hashfile .zip SHA256. Extract to a known folder and add to PATH or run tools from that folder.
On Windows install the OEM USB driver for your brand (Google USB Driver for Pixels, Samsung Kies/Odin-drivers if required, Qualcomm/MediaTek drivers for specific chipsets). Confirm connection with adb devices and fastboot devices; if devices do not appear, try a different USB port (rear ports on desktops) and a data-capable USB cable.
Download and verify all firmware and image files specific to your exact model and build: stock factory image, stock boot/recovery images, vbmeta, and the custom recovery or tooling you plan to use. Check SHA-256 hashes for each file and keep original stock images on offline storage (external HDD or USB stick).
Prepare the PC environment: disable automatic OS updates and sleep, use an administrative account (Windows: Run as Administrator; macOS/Linux: use sudo for commands), close backup and sync apps that may interfere with USB traffic, and ensure a reliable internet connection for token requests or vendor unlock pages.
Create a written rollback plan: list exact fastboot/flash commands to restore stock images, keep vendor unlock codes and account passwords accessible, and store a copy of the stock firmware and flashing tools on a separate medium to use in case of recovery attempts.
Confirm exact device model, build number and Android version
Verify model and build before any modification: open Settings → About phone and copy Model number, Build number, Android version, Security patch level, Kernel version and Bootloader version exactly as shown.
Collect the same information via ADB so it cannot be misread: connect device and run adb shell getprop ro.product.model, adb shell getprop ro.product.device, adb shell getprop ro.build.fingerprint, adb shell getprop ro.build.version.release and adb shell getprop ro.build.version.sdk. Save output with adb shell getprop > device-props.txt.
Confirm the bootloader/vendor identifiers used by developers: check adb shell getprop ro.bootloader, adb shell getprop ro.product.board and adb shell getprop ro.build.product. Match those values against the target image or package name exactly (case-sensitive).
From fastboot mode validate hardware name and versions: use fastboot devices then fastboot getvar all (or fastboot oem device-info on some vendors). Note product, version-bootloader, version-baseband and unlocked flags.
Compare build fingerprint and incremental build ID from device with the firmware or recovery image signature posted by the maintainer or vendor. A mismatch in fingerprint, model codename or incremental ID is a common cause of bootloops and nonfunctional images.
Account for regional and carrier variants: examples – Samsung SM-G991B vs SM-G991U, Pixel 7 vs Pixel 7 Pro, OnePlus IN202x vs LE2120. If the model string differs by a single character or suffix, obtain an image that explicitly lists support for that exact model and build.
If a third-party package lists a device codename, verify the codename using adb shell getprop ro.product.device and cross-check the maintainer’s thread or repository tags. Do not rely on marketing names; use build properties and fastboot product output.
Keep these outputs as proof before flashing: attach device-props.txt and fastboot-getvar.txt to any support request. When seeking files, paste exact values for ro.build.fingerprint, ro.product.device and the bootloader string to avoid mismatched downloads.
What is Android System WebView – Meaning, Uses & How to Fix Issues
Purpose and behavior: The embedded browser engine lets applications render HTML, execute JavaScript, display OAuth/login flows and show payment pages without opening a full browser. The component is delivered as an updatable package from the device vendor or Google; mismatched major versions between that package and the main browser commonly cause rendering errors, blank pages, script failures and crash loops. Check version numbers: the renderer’s major release should match the device browser’s major release (for example, 125.x with 125.x).
Immediate remediation steps: 1) Open Google Play and update the renderer package published by Google LLC (or the vendor if shown). 2) Update the device browser (Chrome) so its major version matches the renderer. 3) Clear the renderer app cache: Settings → Apps → See all apps → enable display of preinstalled apps → locate the web renderer entry → Storage & cache → Clear cache. 4) Tap Force stop and reboot the device. Here is more information in regards to 1xbet promo codes check out the web site. If problems persist, use the Play Store page for the renderer to Uninstall updates and then reinstall the latest update.
Further checks for stubborn failures: Disable battery optimizations or aggressive app-killers for affected apps, test the same link inside a different app to rule out a single-app bug, and boot into safe mode to exclude third-party interference. If you maintain logs, capture a logcat trace during a repro to look for renderer-related stack traces and MIME/type errors. Ensure auto-update is enabled for both the renderer and the browser via the three-dot menu on their Play Store pages.
If the problem continues: Reinstall Play Store updates, clear Play Store cache, sign out and back in to the Play Store account, then repeat the renderer/browser update sequence. When contacting app support or the device vendor, report exact renderer and browser version strings and include a short log excerpt showing the failure; that speeds diagnosis and reduces back-and-forth.
Concise definition and role
Update the embedded browser engine from the device’s app store and enable web-content debugging only in development builds.
An in-app web renderer based on Chromium that lets native applications display HTML/CSS/JS and run scripts without launching an external browser; it provides page rendering, DOM and network handling, JavaScript execution, and hooks for native–web communication.
Developer-facing features: loadUrl and loadDataWithBaseURL for navigation, evaluateJavascript for asynchronous script execution (returns results to a callback), WebViewClient and WebChromeClient for navigation and UI events, CookieManager for cookie control, WebSettings for toggling JavaScript, DOM storage and caching, and addJavascriptInterface for binding Java objects to JS (use with restrictions).
Security controls to apply by default: keep JavaScript disabled unless required; avoid addJavascriptInterface on platform versions older than API 17; setAllowFileAccess(false), setAllowContentAccess(false), setAllowFileAccessFromFileURLs(false) and setAllowUniversalAccessFromFileURLs(false) when file access is unnecessary; use setMixedContentMode(WebSettings.MIXED_CONTENT_NEVER_ALLOW) on builds supporting it; always validate and sanitize URLs and input; never ignore SSL errors (do not call handler.proceed()).
Performance and lifecycle guidance: call onPause()/onResume() and pauseTimers()/resumeTimers() appropriately; invoke destroy() in onDestroy() to free memory; prefer a single reusable instance per activity when possible; enable hardware acceleration for smooth rendering; use evaluateJavascript instead of loadUrl(“javascript:…”) for lower overhead and returned values.
Compatibility notes: implementations are provided by the device vendor or default browser package and receive separate updates via app distribution channels; test web behavior across engine versions and vendors, and include runtime checks (e.g., WebView.getCurrentWebViewPackage()) when behavior depends on provider capabilities.
One-line technical definition
Use the platform’s embedded Chromium-based browser runtime to render and execute HTML/CSS/JavaScript inside application processes; it exposes a native Java/Kotlin API plus a JS bridge, runs sandboxed with a separate renderer process using Blink and V8, supports hardware-accelerated compositing, remote DevTools debugging, per-origin permission and mixed-content policies, and receives security patches via the app-distribution channel.
Redmi 10A Android Version — Which Android Does It Run?
Short answer: the device arrives with Google mobile OS 11 (Go edition) layered by MIUI 12. If you are you looking for more information in regards to 1xbet philippines registration visit the page. 5. For everyday use keep the system as provided: the lightweight OS build and Xiaomi skin are tuned for low-RAM configurations and will deliver the best balance of responsiveness and battery life.
Key hardware that shapes software behavior: MediaTek Helio G25 CPU, 2/3/4 GB RAM options, 32/64 GB onboard storage with microSD support, 6.53″ HD+ display and a 5,000 mAh battery. The Go-flavored platform is optimized for devices with 2–3 GB of memory, reducing background memory pressure and improving app launch times compared with full-featured platform builds.
Practical recommendations: keep MIUI updated via official OTA for security patches, prefer Go or Lite editions of apps where available, restrict background app activity for heavy apps, and avoid demanding 3D games if sustained frame rates matter. If a later base-platform release is essential, evaluate newer models that ship with that release out of the box; custom firmware is possible but limited by scarce developer builds and locked bootloaders.
Quick Answer: Current Android Version on Retail Redmi 10A
Retail units ship with MIUI 12.5 layered on Google’s mobile OS level 11 (API 30); selected regions later received MIUI 13 builds while the core OS base generally remained at level 11 as of June 2024.
- How to verify: Settings → About phone → MIUI build and System update → check for OS base (look for “OS level” or “API” if shown).
- Security status: Check Settings → About phone → Security patch level; apply OTA patches immediately to keep platform and apps current.
- Update route: Use the system updater (Settings → System update) or Xiaomi’s official recovery/flash tools for stable releases; always back up data before flashing.
- If you need a newer OS base: Options are waiting for an official OTA, enrolling in a regional MIUI beta (if available), or installing a community-supported custom build (e.g., LineageOS). Community installs carry warranty and stability risks–only proceed with verified builds and full backups.
- Support expectations: Entry-level models typically receive limited major base upgrades; plan on security patches for roughly two years and confirm upgrade promises for your purchase region with the vendor.
Default Android version shipped from factory
Factory units leave the box running an AOSP 11-based build with MIUI 12.5; low-RAM trims commonly use the Go Edition.
Verify on the handset: open Settings > About phone and check the MIUI entry, Build number and Security patch level. Typical launch build strings show MIUI 12.5 identifiers alongside an AOSP 11 base (for example: MIUI 12.5.x – AOSP 11 build markers).
Launch security patch dates for retail stock are generally within the March–May 2022 window; older inventory can carry earlier patches, so check the patch level immediately after unboxing.
Update guidance: connect to a stable Wi‑Fi network, ensure battery >50%, back up user data to cloud or local storage, then install any available OTA. Major MIUI updates may add features without changing the AOSP base, so read the OTA changelog before applying.
When buying new or refurbished units from third parties, confirm the factory OS state by inspecting the box sticker and performing the Settings > About phone check before finalizing the purchase.
Recover Deleted Photos on Android – Easy Step-by-Step Guide (Free & No Root)
Immediate action: stop using the phone storage and switch to Airplane mode, remove any microSD card and write-protect it if possible, then inspect cloud backups and in-device recycle bins before doing anything else. Google Photos trash keeps items for 60 days; OneDrive and Dropbox typically retain removed files for about 30 days. Check Gallery app’s “Trash” or “Recycle bin” and any manufacturer cloud (Samsung, Xiaomi) immediately.

If images were on a microSD card, remove the card and use a card reader with a PC. Recommended free tools: PhotoRec (open-source) and Recuva (Windows). Set the tool to scan the whole device, target common formats (JPEG, PNG, HEIC), and save recovered files to a different drive than the one being scanned. Typical success on untouched SD cards: 85–95%; if the card was used after loss, success drops sharply.
For internal flash storage without elevated privileges, options are limited but still useful: 1) check cloud sync and app-specific trash; 2) run DiskDigger app from Google Play to extract available thumbnails (no superuser access limits it to cached images); 3) export an ADB backup of the DCIM and Pictures folders (enable Developer Options and USB debugging) with adb pull /sdcard/DCIM and /sdcard/Pictures to copy intact files. Full block-level imaging of internal partitions usually requires superuser access, so expect recovery rates under 50% for overwritten content.
Practical checklist: 1) stop writing to device; 2) check all trash/recycle bins and cloud providers (Google Photos 60 days); 3) remove microSD and scan on PC with PhotoRec/Recuva; 4) try DiskDigger on-device for cached images; 5) if you have a PC, copy entire /sdcard folders via adb pull before running any scans. When using PhotoRec, filter by file headers (JPEG begins with FF D8 FF) and save output to a separate drive to avoid overwriting.
Expect the highest success when acting within hours and when external cards are scanned with dedicated recovery software. If free methods fail and the images are critical, consider a professional service that can image internal storage without further writes, but begin with the steps above to maximize the chance of retrieval without requiring superuser privileges.

Quick Checklist Before You Start
Stop using the device immediately if images are missing: disable Wi‑Fi and mobile data, do not open camera or messaging apps, and avoid installing any recovery-related apps on the phone.
- Check cloud backups and account syncs via web: log into Google account, OneDrive, Dropbox, or manufacturer cloud and inspect the Trash/Recycle Bin – Google retains removed items for up to 60 days; most consumer cloud services retain them ~30 days.
- If content lived on an external SD card, power off, remove the card and use a USB card reader on a PC. Create a sector‑level image (.img) of the card first (tools: dd/ddrescue on Linux, Win32 Disk Imager on Windows) and run scans against the image, never the original.
- If content was on internal storage, avoid adding new files. Enable USB debugging only if you will use ADB extraction (Settings → About phone → tap Build number seven times → Developer options → USB debugging). Installing scanner apps on internal storage can overwrite recoverable data.
- Record device details: exact model, Android version, storage type (eMMC vs UFS), encryption status and whether a PIN/password was set. These facts determine which extraction methods are feasible.
- Locate likely folders and timestamps beforehand: DCIM/Camera, Downloads, WhatsApp/Media, Telegram, or app-specific media folders. Note the last-modified dates and approximate time window when items were removed.
- Charge the battery to ≥50% or connect to power before long operations to avoid interruptions during imaging or scanning.
- Prefer PC-based tools that work on disk images. If using software, verify vendor reputation, run in read‑only mode when possible, and keep the original media untouched.
- If the device uses file or full-disk encryption (Android 6+ common), expect limited success without the device credentials or root-level access; focus first on cloud backups and any removable card scans.
- Create a log of every action you take (dates, tools, files imaged) so you can revert steps or share accurate info with support or specialists.
Stop using the phone to avoid overwriting
Power the device off immediately and remove any microSD card if present.
Why: mobile storage marks erased files’ blocks as free; any new write can occupy those exact sectors. Typical 12 MP JPEGs are 3–6 MB, HEIC files 1–4 MB, and RAW/Pro captures 20–40 MB. On a nearly full volume a single new picture or a few app caches can overwrite target data within seconds or after a few megabytes of writes.
If the device uses a removable card: do not open the card on the phone. Use a dedicated card reader and create a bit‑for‑bit image on a PC. Recommended tools: Linux dd (sudo dd if=/dev/sdX of=./card_image.img bs=4M conv=sync,noerror), GNU ddrescue for damaged media, or Windows FTK Imager / Win32 Disk Imager. Use a hardware write‑blocker if available; otherwise ensure the card is mounted read‑only before imaging.
If the device only has internal storage: avoid booting or interacting with the OS. Do not enable developer options or USB debugging (those actions write to system logs and settings). If powering off is impossible, immediately enable Airplane Mode, disable Wi‑Fi and mobile data, and stop camera, messaging and cloud backup apps – but understand any change to app state can produce writes. The safest route for internal NAND is to contact a data‑extraction specialist rather than attempt DIY changes that may reduce success chances.
Stop all activities that generate writes: taking new pictures, screenshots, installing/uninstalling apps, accepting large messages or MMS, streaming that caches, auto‑sync and automatic backups. Avoid browsing, opening large attachments, or running device updates; each of these can allocate free blocks.
Document the device state: note battery level, whether an SD card was present, last actions performed on the phone, and whether any cloud backups were active. If you have any questions pertaining to where and ways to utilize 1xbet login ph, you can contact us at the webpage. Provide this info to the person or service handling the imaging – it helps decide between card imaging, logical extraction, or chip‑level approaches.

How to Check Android Version (Find Your Phone’s Android Version)
Open Settings → About (or About phone) → Software information. Read the lines labeled OS release, Build number and Security patch level to get the system release number, build identifier and patch date immediately.
Look specifically for: Release (numeric, e.g. 12, 13, 14), Build ID, API/SDK level and the Security patch date in YYYY‑MM‑DD format. Release and patch fields together show feature set and how recent security updates are.
Quick vendor paths: Samsung – Settings → About phone → Software information; Google Pixel – Settings → System → About phone; Xiaomi – Settings → About phone → MIUI release; OnePlus – Settings → About phone. Carrier-branded models may append extra build identifiers – inspect the Build ID for that detail.
If the release number or patch date is outdated, open Settings → System → System update (or Software update) to fetch official updates. For verification beyond the UI, review the bootloader/recovery info or connect via adb to list build identifiers and confirm the exact firmware string.
Check Android Version in Settings > About Phone
Open Settings → About Phone, then tap “Software information” (or “All specs”) to view the operating system release, build number, security patch level and kernel details.
Interpretation of fields: Build number – firmware identifier that often contains model code and build tag; Security patch level – date in YYYY‑MM‑DD format showing the latest security update applied; Kernel version – Linux build string with timestamp and compiler info; Baseband/Radio – modem firmware version for cellular connectivity; API/SDK level – numeric platform level when listed.
If the Software information screen is minimal, expand “Advanced” or tap “Model & hardware info”; some OEM skins (One UI, MIUI, OxygenOS, ColorOS) label entries as “Software info”, “About device” or “Phone details”. Use the Settings search field with terms like “build”, “security” or “kernel” to jump directly to the relevant line.
To save or share the data, long‑press a copyable field or use the Share icon when present; otherwise take a screenshot and include the full About screen in communications with support or when comparing firmware builds. Tapping Build number repeatedly unlocks Developer options on most devices if additional system identifiers are required.
Open the Settings app
Tap the gear icon in the quick settings panel – swipe down twice from the top edge to reveal it immediately.
-
Quick settings (fastest)
- Swipe down once to open notifications, then again to expand quick tiles.
- Tap the gear icon at the top-right (or top-left on some skins).
-
App drawer
Open the app drawer and tap the Settings entry (gear icon). If the drawer supports search, type “settings” to jump to it.
-
Home-screen shortcut or widget
- Long-press an empty area on the home screen.
- Select Widgets > Settings shortcut, then choose the specific settings target (Wi‑Fi, Battery, App info, etc.).
-
Power menu
Press and hold the power button; on some builds a gear or Settings shortcut appears on the power menu. If you loved this information and you would love to receive details relating to 1xbet philippines app download kindly visit our own web-page. Tap it to open system settings.
-
Lock screen gear
Certain custom skins present a small gear on the lock screen–swipe or tap to access Settings without unlocking fully.
-
Voice assistant
Say the assistant command to open Settings (e.g., “Open settings”) when voice control is active.
-
Third‑party launchers and gestures
Check launcher settings for a swipe-up, double-tap or edge gesture mapped to Settings; many launchers allow adding a dedicated gesture for instant access.
- Pixel (stock): swipe down twice then tap the gear; power-menu settings also available.
- Samsung One UI: swipe down once to reveal quick tiles, then expand; long-press the Settings icon in the app list to place a home shortcut.
- MIUI / ColorOS / EMUI: app drawer shortcut or Widgets > Settings shortcut works consistently across these skins.
If the Settings app fails to open, restart the device, boot into safe mode to rule out interfering apps, or clear launcher cache from the system app manager.
-
Best PC Games on Android – Top PC Ports, Emulators & How to Play
Use local streaming from a gaming PC with Steam Link or Moonlight for optimal fidelity and low latency: set the host encoder to NVENC or AMD VCE at 60 FPS, enable hardware decoding on the client, connect both devices to a 5 GHz Wi‑Fi or wired gigabit network, and pair a Bluetooth controller such as the Xbox One S, DualShock 4 or DualSense. In case you have just about any concerns relating to wherever as well as the way to make use of 1xbet sign up, you’ll be able to e-mail us with our own webpage. Expect measured round‑trip latency around 30–70 ms on a local LAN; if latency exceeds 120 ms, lower client resolution to 720p and disable V‑sync on the host.
If you require remote access outside your home network, use cloud streaming services like NVIDIA GeForce NOW, Xbox Cloud Gaming or Amazon Luna. Allocate at least 15 Mbps for 720p60, 35 Mbps for reliable 1080p60, and 50+ Mbps for 4K; pick the nearest data center and prefer wired or high‑quality mobile broadband to minimize jitter and packet loss.
To run native PC builds on handheld hardware, prioritize ARM‑compiled or mobile‑optimized releases. For legacy x86/x64 software, deploy compatibility layers and lightweight translation stacks (Box86/Box64 plus Wine variants) on devices with generous CPU and RAM; target older or less demanding titles when using translation stacks, and scale resolution to 50–75% to maintain frame rates.
Configuration and hardware notes: host on an SSD, reserve 2–4 CPU cores for the encoder, and cap in‑game FPS to match the client display. On the mobile side, use a USB‑C Ethernet adapter when possible, disable background sync and adaptive brightness, and monitor thermal throttling–sustained sessions often require cooling or shorter sessions to avoid CPU/GPU slowdowns.
Do you mean 10 sections? You wrote “0” – please confirm the number of headings you want.
Confirmed: 10 headings is recommended – I will outline each heading title, its purpose, target word count, and concrete editorial requirements.
1. Scope & target audience – Define audience (casual users, controller owners, power tinkerers), list article goals and inclusion/exclusion criteria. Target: 200–350 words. Include one clear persona and a short use-case table (3 rows).
2. Minimum and recommended hardware – Provide CPU/GPU model examples, RAM thresholds, storage type (UFS vs eMMC) and I/O throughput targets (e.g., 200 MB/s). Target: 300–450 words. Include a 3-point checklist and two model recommendations for low-end and high-end.
3. Input methods and controller setup – Cover supported controller protocols (Bluetooth, USB HID), button mapping tips, and latency thresholds (ideal ≤40 ms). Target: 250–400 words. Add configuration snippets for two popular controller apps and preferred deadzone settings.
4. Performance tuning and graphics settings – Recommend resolution/frame-rate pairings (1080p@60, 720p@60 for low-end), thermal throttling mitigation (60% CPU cap, sustained CPU/GPU temps). Target: 350–500 words. Provide a 5-step tuning checklist and benchmark targets (FPS stable within ±5%).
5. Storage, installation and file handling – Explain package placement, OBB/expansion file handling, recommended free space margin (20–30%), and SD card speed class (U3 or A1+). Target: 250–350 words. Include transfer commands and checksum verification advice.
6. Network, streaming and latency management – Recommend wired vs Wi‑Fi bands (5 GHz preferred), upload/download throughput targets for streaming (≥10 Mbps for 720p@60), NAT and MTU tips. Target: 300–450 words. Add ping thresholds and QoS suggestions.
7. Legal, licensing and account issues – Outline DRM, sideloading risks, account linking pitfalls, and safe sources. Target: 200–300 words. Provide a short risk matrix and a citation-style list of authoritative sources.
8. Compatibility testing and troubleshooting – List reproducible test cases, log collection commands, and common crash signatures. Target: 300–400 words. Include a triage flowchart text (steps to reproduce → collect logs → test alternate device).
9. Power and thermal management – Offer battery drain estimates (e.g., 10–20% per hour under heavy load), recommended power profiles, and accessory suggestions (active cooling pads). Target: 200–300 words. Provide quick tuning presets for battery saver and performance modes.
10. Quick reference, metadata and publishing notes – Suggested slug, meta title length (50–60 characters), meta description (140–155 characters), canonical strategy, estimated read time per heading, and image/asset checklist (screenshots, controller diagrams). Target: 150–250 words.
Editorial notes – Target total article length ~3,000–4,000 words; interlink at least 6 internal resources; include 6–10 annotated screenshots, one table of hardware comparisons, and an FAQ of 6 short Q&A items. State whether you want me to expand any single heading into a full draft.
Samsung A51 Android Version — What Android Does It Run?

Recommendation: For best security and app compatibility, update the device to Google’s OS release 13 (One UI 5) where available. The handset shipped with Google release 10 and received official major upgrades to releases 11, 12 and 13; carriers and region-specific builds can delay OTA availability, so check the Software update screen if an automatic prompt hasn’t arrived.
Concrete data: Factory firmware: Google release 10 with One UI 2.x. Major public OTAs: release 11 → One UI 3.x, release 12 → One UI 4.x, release 13 → One UI 5.x. Security-patch cadence moved from monthly in the initial years to less frequent rollouts later; precise patch level depends on the market and carrier build.
Before applying an OTA: back up user data, confirm battery ≥50%, connect to stable Wi‑Fi, and free 4–6 GB of internal storage for the installer. If the update is not visible in Settings → Software update → Download and install, try the vendor desktop updater (Smart Switch) or consult your carrier’s support pages. If official updates stop at release 13 and you need a newer Google release, evaluate verified community firmware for your exact model and bootloader status before flashing.
Stock Android Version at Launch
Install the first major system upgrade (platform 11) within three months and enable automatic security updates.
Factory firmware shipped based on Google’s mobile platform 10 with One UI 2.0. Commercial release occurred in December 2019; initial security patch level on boxed units was December 2019.
To verify: open Settings > About phone > Software information to read the build string and security patch date. If flashing factory images, obtain official files from the manufacturer’s support portal, match the exact model code, and follow the vendor flashing guide to avoid bricking or warranty issues.
If the handset still runs the original platform build, prioritize over-the-air updates for monthly patches rather than custom releases; keep a full backup before any major system change and confirm bootloader unlock status before proceeding with unofficial software.
Original Android release and One UI shipped
Recommendation: Preserve the factory firmware package and copy the shipped One UI build ID from Settings → About phone → Software information before applying any updates or custom software; perform a full backup with the manufacturer’s backup tool or a booted recovery image so you can restore the stock state if anything goes wrong.

Early production units shipped with the One UI 2.0 family; some later batches and certain carrier-branded units left the factory with One UI 2.1. The 2. When you have just about any inquiries relating to exactly where and also the way to employ 1xbet ios philippines, you can call us on the web page. 1 build introduced incremental camera tweaks, UI polish to quick settings and notifications, and several small stability fixes compared with initial 2.0 releases.
Regional and carrier build codes (CSC) determine which One UI minor release and preinstalled packages arrive on a device. Check the CSC and build string in Download mode or the Software information screen and record both values; flashing firmware for a different CSC can cause network or modem incompatibilities and will not replicate the original out-of-box environment.
To identify the shipped firmware precisely, note the full build string shown in Software information and the security patch date. Keep a copy of the original AP/BL/CP files (or full factory package) obtained from the official support channel for that exact build string so you can recover the original firmware if needed.
Be aware that unlocking the bootloader or flashing unsigned images will trip the hardware-backed security flag used by banking and DRM apps and is detectable by service centers; warranty and secure-app functionality may be affected. If you plan to modify the device, export a full userdata backup, save the original firmware files, and verify compatibility of any custom package against the recorded CSC and build ID.
OTA updates were delivered incrementally by region and carrier; if you need to remain on the factory UI for app compatibility or enterprise requirements, avoid applying OTAs until you confirm the update build in the official changelog matches your region’s CSC and backup is complete.
Smart TV vs Android TV – Which Is Better? 2026 Comparison & Buyer’s Guide
Pick a Google-powered platform on a connected television if your priorities are the largest app catalog, monthly security patches and native casting; choose a maker’s proprietary operating system if you want lower upfront cost, a simpler user interface and slightly lower input lag on comparable panels.
Target specifications: aim for ≥2 GB RAM and ≥8 GB flash if you plan to install additional apps; choose panels with HDMI 2.1, VRR and 4K@120Hz support for modern consoles; seek measured input lag ≤20 ms for 60 Hz gaming and ≤10–15 ms in game mode on high-end sets. Expect HDR performance differences driven by peak brightness (look for ≥600 nits for visible HDR highlights) and native 10‑bit panels for smoother gradients. Typical retail ranges: budget connected sets $200–$350, midrange $400–$800, premium $900+ for models with full HDMI 2.1 and advanced panel tech.
Software maintenance and app access matter: Google-backed systems tend to offer monthly platform/security updates from the platform vendor, though manufacturer rollout can vary; many manufacturer-branded systems deliver quarterly or less frequent updates and may stop major upgrades after 12–36 months. If you need niche streaming apps or sideloading, prioritize the platform with an open app store and developer support; if you only use Netflix/Prime/Disney+/Hulu, most vendor OSes include those by default.

Checklist for purchase: confirm RAM/storage, verify official update policy (minimum 2 years advised), check HDMI 2.1 and low-latency measurements if gaming, and validate native support for the streaming services you use. For living rooms where simplicity and low cost win, choose a well-reviewed manufacturer OS model; for power users who want maximum app choice, Chromecast-like casting and regular patches, choose a Google-backed model.
OS Comparison: Proprietary Smart TV vs Android TV
Recommendation: pick a vendor-built platform when you want a fast, tightly integrated experience with lower hardware needs and curated apps; pick a Google-based platform when you need the largest app catalogue, casting/streaming interoperability, sideloading and better support for third-party apps and game streaming.
- App ecosystem
- Vendor-built platform: curated store, fewer niche apps, certified vendor partners (streaming giants and regional apps usually present).
- Google-based platform: access to Play Store, thousands of apps, frequent app updates independent of firmware releases.
- Firmware updates & security
- Vendor-built platform: firmware releases typically pushed by manufacturer; update cadence varies–check vendor support page for specified years of patches.
- Google-based platform: Play Services and app updates are continuous; OS-level patches depend on OEM–verify promised support window before purchase.
- Performance & hardware requirements
- Minimum baseline: 2 GB RAM and 8 GB flash for basic streaming; models with 4 GB+ RAM and 16 GB+ storage deliver noticeably smoother multitasking and app installs.
- Preferred SoC: quad-core CPU 1.5 GHz or better and a dedicated GPU for UI animations, codecs and cloud gaming.
- Codec support: ensure hardware decode for H.265 (HEVC), VP9 and AV1 if you plan 4K HDR streaming–AV1 hardware decode reduces bitrate and CPU load.
- Privacy & telemetry
- Vendor-built platform: telemetry scope varies by manufacturer; some allow broad opt-outs in settings, others do not–review privacy policy before buying.
- Google-based platform: account ties and Play Services increase data flows to Google; adjust account settings and disable unused features to limit data sharing.
- Interoperability & streaming features
- Vendor-built platform: often offers built-in AirPlay, specific casting protocols and direct integration with brand apps and remotes.
- Google-based platform: native Chromecast capability, wider support for cross-device casting and broad third-party casting SDKs.
- Sideloading & app portability
- Vendor-built platform: sideloading sometimes blocked or limited; porting mobile apps may require vendor SDKs.
- Google-based platform: APK sideloading permitted on many models; app portability from mobile is easier via Play Store and established developer tools.
- Voice assistants and smart-device integration
- Vendor-built platform: may include a proprietary assistant plus integrations with select ecosystems (Alexa, others); check for language and regional support.
- Google-based platform: deep integration with Google Assistant and broad smart-home support if you use Google services.
- Longevity & resale
- Choose models from manufacturers that publish multi-year update policies; devices with frequent security/firmware updates retain value longer.
Practical checklist before purchase:
- Confirm update policy (number of years for OS and security patches).
- Verify hardware decode for AV1, HEVC and VP9 if you use 4K HDR services.
- Minimum specs: 2 GB RAM / 8 GB storage; recommended: 4 GB / 16 GB+ for heavy users and cloud gaming.
- Test remote and voice experience in-store if possible (pointer vs directional pad, dedicated app buttons, latency).
- Read privacy settings options and whether telemetry can be disabled.
Configuration tips after purchase:
- Disable unused voice or diagnostic services, sign out of unused accounts, enable automatic app updates only for trusted apps.
- Use wired Ethernet for lowest latency and consistent streaming bitrates; reserve 5 GHz Wi‑Fi for high-bitrate 4K content.
- Keep firmware updates enabled but review release notes; set a restore point or backup account where available.
Quick decision map: if you value smooth UI on modest hardware and a curated set of apps, pick a vendor-built platform; if you prioritize the broadest app selection, casting compatibility, sideloading and easier app development, pick a Google-based platform.
Identify core OS type on the spec sheet
Prefer models that explicitly list a named platform and version plus the app storefront and an update window; if the spec only says “Proprietary” or “Custom UI,” treat the OS as unknown and verify further before purchase.
Common spec strings and their likely meanings: “webOS 6.x” → LG platform; “Tizen 7.x” → Samsung platform; “Roku OS 11/12” → Roku platform; “Fire OS 7/8” → Amazon platform; “AOSP-based 13” or “Google Play” entries → Google-derived platform; “Linux-based” or “Linux kernel” often signals a vendor-customized system.
Quick detection signals: presence of “Google Play Store”, “Google Assistant” or “Chromecast built-in” indicates Google services; “Roku Channel Store” or “Roku Voice” indicates Roku; “LG Content Store” or “Magic Remote” points to LG; “Samsung Apps” or “Bixby” points to Samsung. If the spec lists a named app store, that store usually defines the usable app ecosystem.
Streaming and DRM clues: “Widevine L1” on the spec means most major services will allow HD/4K playback on that platform; “PlayReady” or “FairPlay” indicate support needed for some providers. Look for codec support (HEVC/H.265, VP9, AV1) and service certifications like “Netflix 4K” or “Prime Video 4K” to confirm real-world playback capability.
If the spec is vague, take these verification steps: check the manufacturer’s support pages for an OS version history and app compatibility list; inspect retailer screenshots or video demos for app icons; search the firmware changelog for platform names and version numbers; ask retail support whether the device ships with a named app store or only a vendor app catalog.
Update policy checklist: prefer devices that promise at least two major platform upgrades and a minimum of three years of security patches. If the spec sheet lacks update commitments, find the manufacturer’s policy page or past device update record before assuming long-term support.
Developer/sideload indicators: a spec entry listing “ADB”, “developer mode”, “USB app install” or “third-party app sideloading allowed” reveals options for installing apps outside the built-in store; absence of these entries plus a closed “app catalogue only” remark means less flexibility.
For more regarding promo code for 1xbet stop by the web site.
- App ecosystem
Best Android TVs 2026 — Top Picks, Reviews & Buying Guide
Immediate recommendation: choose the LG C3 OLED 55″ for reference-level contrast and gaming responsiveness – 4K resolution, 120 Hz native panel, measured input lag ~7 ms at 4K/120 Hz in game mode, full Dolby Vision and HDR10 support, and local dimming that delivers near-infinite native contrast. Typical 55″ retail ranges from $1,200–$1,800 depending on promotions; sizes available 42″–83″.
Bright-room alternative: consider the Samsung S95C QD-OLED or a mini-LED model such as the Hisense U8H for peak luminance above 1,000 nits, superior specular highlight performance, and multi-zone local dimming. Expect HDR peak brightness in the 1,000–1,500 nit window on HDR patterns, low latency (~8–12 ms at 4K/60–120 Hz), and at least two HDMI 2.1-capable inputs for 4K@120 Hz consoles.
Value selection: the TCL 6-Series (R655) and similar mid-range mini-LED/QLED sets deliver strong contrast, effective local dimming, and very competitive price-per-inch – common 55″ retail under $800 with measured input lag near 10 ms and support for VRR and ALLM. Look for models with >= 3 HDMI inputs and one or more 48 Gbps HDMI 2.1 ports if you plan 4K@120 Hz gaming.
Choose by use case: for cinema prioritize OLED or QD-OLED for >1,000,000:1 native contrast and deep black levels; for bright rooms prioritize mini-LED with >1,000 nit peak; for gaming demand <12 ms input lag, VRR support, and at least one HDMI 2.1 input that delivers 4K@120 Hz. For streaming and app availability prefer sets running Google TV or equivalent platforms that include the major streaming apps and a responsive voice assistant.
When comparing models, check these measurable criteria: input lag (aim <12 ms at target resolution/frequency), peak brightness (target >1,000 nits for bright-room HDR), HDR format support (Dolby Vision and HDR10+ coverage where applicable), HDMI bandwidth (48 Gbps for full 4K@120 Hz passthrough), and panel refresh (native 120 Hz vs. effective). Use those thresholds to match specific sets to your viewing and gaming priorities.
Top Overall Android TVs 2026
Choose the Sony A95L QD‑OLED for reference-grade color and HDR: available in 55/65/77 inches, true deep blacks, QD‑OLED peak spec highlights often cited above 1,000 nits in small‑window HDR, near‑zero native motion blur, and measured input lag under 10 ms in Game Mode at 4K/120Hz; two full‑bandwidth HDMI 2.1 ports (48 Gbps), eARC, Dolby Vision and IMAX Enhanced support; expected street pricing by size ranges roughly mid‑four figures for 65″ and higher for 77″.
For bright rooms and console play, prefer a mini‑LED 4K model with extensive local dimming (example: Sony X95L series or equivalent): full‑screen HDR sustained luminance often 1,200–2,000 nits depending on model and window, thousands of dimming zones, 120–144 Hz panels, VRR/ALLM/AMD FreeSync Premium support, input lag typically 7–12 ms at 4K/120; choose the largest size that fits your seating distance to maximize immersion without losing peak contrast.
Value segment recommendation: Hisense U8H (Google TV) or comparable midrange 120 Hz sets deliver high HDR peak numbers (~800–1,200 nits for small windows), native 120 Hz panels, Dolby Vision + HDR10+, low latency ~10 ms, and advanced processing for under $1,000 for 65″ in many markets–solid choice if you want modern features without flagship pricing.
Connectivity checklist before purchase: minimum two HDMI 2.1 ports at 48 Gbps (one with eARC), gigabit Ethernet, Wi‑Fi 6/6E preferred, Bluetooth LE for controllers and remotes; verify the manufacturer enables 4K/120Hz + VRR over the advertised ports and supplies reliable firmware updates for at least 3 years.
Quick calibration and setup rules: set picture mode to Cinema/Filmmaker for movies and Game for consoles; color temperature Warm2 (~6500K) and SDR gamma around 2. In case you have any inquiries with regards to where and how to work with 1xbet promo code philippines, you are able to contact us in our own web-page. 2; for HDR keep tone‑mapping on Auto/Standard, disable motion interpolation for film content, enable Auto Low Latency Mode (ALLM) and VRR for gaming, and use a high‑quality 48 Gbps HDMI cable to guarantee 4K/120Hz with full chroma and HDR metadata.
Screen‑size guidance: 55–65″ for seating 6–9 ft, 75–85″ for 9–14 ft; pick QD‑OLED for dedicated dark‑room cinema, mini‑LED for bright living rooms and sports, and midrange 120 Hz IPS/VA sets for a balance of features and price. Check measured reviews for HDR tone mapping behavior and input lag specific to the model you plan to buy.
Best all-around pick for mixed use
Sony A95L 55-inch QD-OLED – recommended for households that juggle movies, console gaming, live sports and streaming: 4K native, QD-OLED panel with deep blacks and high color volume, native 120 Hz, four HDMI 2.1 inputs, VRR (FreeSync & G-Sync compatible), ALLM, Dolby Vision + HDR10 + HLG support, typical 4K/120Hz input lag ~9 ms.
Choose screen size by viewing distance: 48–55″ for seating under 10 ft, 65″ for 10–14 ft, 77″ or larger for 14+ ft. For very bright rooms pick a mini‑LED alternative such as Samsung QN95-series (peak HDR highlights ~1,500–2,000 nits, strong anti‑reflective coating, similar low-lag gaming features).
Picture setup for mixed use: Movies – set Picture Mode to Cinema/Custom, color space to Auto, Gamma 2.4 for dim rooms (2.2 for brighter rooms), contrast 100, OLED Light around 45–60 depending on ambient light; Gaming – enable Game Mode, VRR on, HDMI input set to 4K/120Hz with a certified 48 Gbps cable, disable motion smoothing. HDR tone mapping: Auto or Scene‑by‑Scene for best highlight roll‑off.
Practical gaming tips: use the HDMI port labeled 4K/120 or Game, confirm VRR range (typically 40–120 Hz) in the set’s service menu if available, enable ALLM so consoles switch modes automatically, and target 4K/60–120 for modern console titles while using TV upscaling for 1440p PC content.
Burn‑in mitigation (for OLED/QD‑OLED): enable pixel shift, leave screen saver on for long idle periods, use occasional full‑screen dynamic content, run any manufacturer panel refresh cycle after heavy static‑UI use (weekly if gaming with static HUDs several hours daily). For heavy static content choose a mini‑LED instead.
Audio and connectivity: prefer sets with eARC to pass Dolby Atmos to an external decoder; recommended setup – 3.1.2 soundbar or AV receiver with Atmos for clearer dialogue and room‑filling bass. Verify wireless codec support (e.g., SBC, aptX/LDAC) if using Bluetooth headphones regularly.
Quick checklist before purchasing: confirm at least two HDMI 2.1 ports (four preferred), 4K@120Hz native panel, VRR + ALLM, low input lag (<15 ms at 4K/120), Dolby Vision + HDR10, suitable peak brightness for your room, and a smart platform with Google TV app support for broad streaming compatibility.