Why Does Your Android Phone Suddenly Turn Off? Causes & Quick Fixes
Immediate action: check battery health in Settings → Battery (replace if maximum capacity reads ≤ 80% or status is “Poor”); connect a known-good charger and run adb shell dumpsys battery to verify level, health and temperature; if the device powers down again, boot into safe mode to isolate third-party apps and back up critical data before further steps.
Hardware causes dominate: degraded cells with high internal resistance produce voltage collapse under peak load, leading to abrupt power loss. Replace the cell when capacity falls below ~80% of original. Thermal thresholds: SoC throttling typically starts near 45–55°C, while critical shutdowns occur around 85–95°C; battery management will refuse to charge or will cut output outside roughly -10–60°C. Use a USB power meter to confirm charger output (normal 5.0V; fast-charge profiles 9–12V depending on protocol) and observe charge current – sustained currents <500mA usually indicate a bad cable, adapter or port.
Software/firmware faults can cause kernel panics or watchdog-triggered reboots. Capture logs with adb logcat -d and search for “FATAL EXCEPTION”, “kernel panic” or repeated reboot timestamps; generate adb bugreport when possible. Recommended sequence: update system and apps, uninstall recently added apps, clear app caches, boot to recovery and wipe cache partition, then retest. Reserve factory reset until after a full data backup if all else fails.
Practical checklist: 1) remove case and stress-test to detect overheating; 2) boot in safe mode to rule out rogue apps; 3) swap charger/cable and measure charging current; 4) inspect battery for swelling and connectors for corrosion; 5) verify power-button function and moisture indicators; 6) reseat removable batteries; 7) for sealed units, arrange professional battery replacement or board-level diagnostics. If logs show repeated thermal spikes or kernel faults, stop regular use and seek service to avoid data loss or hazard.
Immediate checks to perform right after shutdown
Force a restart: press and hold the power key + volume down for 10–15 seconds; if no response, continue up to 30 seconds, release for 10 seconds, then try again.
-
Charger and cable test
- Use the original charger or a known-good charger. Typical outputs: 5V/1A, 5V/2A, 9V/2A (USB‑PD/QC).
- Swap cables and wall adapters–cheap/old cables often fail. If available, measure current with a USB power meter; expected charging current when powered-down should usually exceed 100 mA. Values under 50–100 mA indicate a bad cable/charger or port fault.
- Try a different outlet and a different USB port on a desktop/laptop (some laptop ports supply limited current when sleeping).
-
Visual and tactile inspection
- Remove case and inspect charging port for lint, corrosion or bent pins; clear debris with compressed air or a wooden toothpick–do not insert metal tools.
- Check for battery swelling: separation of the back cover, bulge, or a pop in the case. If the battery appears swollen, stop charging and arrange a battery replacement; avoid puncturing.
- Look for liquid damage in the SIM tray or under removable covers: a red or pink Liquid Contact Indicator (LCI) usually means exposure to moisture–do not plug into power if LCI shows contact.
-
Temperature and recent conditions
- If the unit was exposed to >45°C (in direct sun or left in a hot car) or below 0°C, allow it to cool or warm to room temperature (20–25°C) for 15–60 minutes before retrying to boot or charge.
- If the device felt very hot before shutdown, wait at least 30 minutes; then try charging with a low-wattage charger (5V/1A) for 10–15 minutes and observe any warm-up or LED activity.
-
Button and connector checks
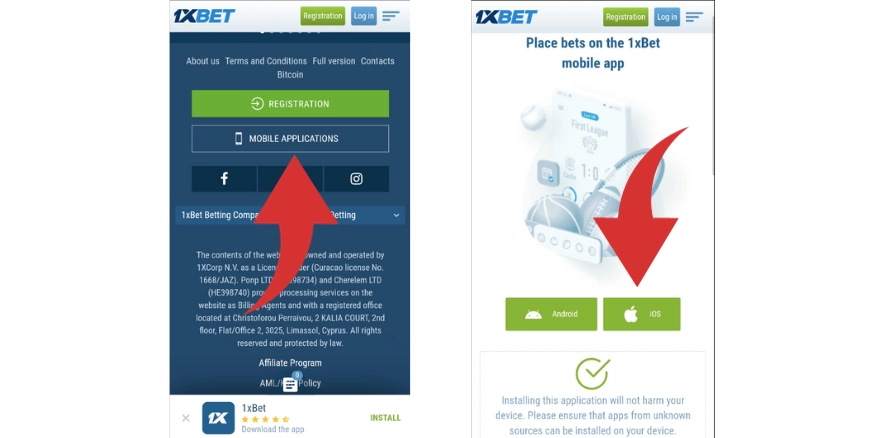
- Ensure the power button and volume keys are not stuck. Should you liked this informative article in addition to you would want to obtain guidance with regards to 1xbet app ios kindly stop by our website. Press each several times–sticky buttons can prevent startups or trigger repeated shutdown behavior.
- Test wireless charging (if supported) with a known-good pad; successful wireless charge LED/animation indicates internal power circuitry is alive even if the display remains dark.
-
Boot-path diagnostics
- Attempt recovery/bootloader: press and hold power + volume up (or power + volume down on some models) for 10–20 seconds. Different manufacturers use different combos–if unsure, try both variants once each with a 30-second pause between attempts.
- Connect to a PC via USB and watch Device Manager (Windows) or System Information (macOS). If the handset enumerates as a USB device, try “adb devices” or “fastboot devices” only if familiar; recognition indicates the bootloader or OS has partial functionality.
-
Short-term data preservation
- If the unit becomes responsive briefly, immediately back up critical data (photos, contacts, messages) to cloud storage or via USB to a computer before further troubleshooting.
-
When to stop and seek professional help
- Do not attempt battery replacement or board-level repair at home unless trained. If none of the above produce signs of life (LED, vibration, USB enumeration) after 30–60 minutes of tests, note serial/IMEI and take the handset to an authorized service center.
- Document the sequence of events (battery level prior to shutdown, temperature, recent impacts or liquid exposure) to speed up diagnostics at the repair shop.
Verify battery level and recent charge history
Record the exact last-full-charge timestamp, the percentage shown before the unexpected shutdown, and the device’s reported full-charge capacity (mAh or %).
Open Settings → Battery → Battery usage (or Battery health) and note: Last full charge time, screen-on time since full, and the top three draining apps. If the OS view is limited, run: adb shell dumpsys battery to obtain fields such as level (0–100), voltage (mV), temperature (tenths °C), status, and health. Convert temperature by dividing the dumpsys value by 10 (e.g., 320 → 32.0 °C). Voltage is already in millivolts.
Interpret values using these practical thresholds: full-charge voltage ≈ 4100–4200 mV; nominal/resting voltage ≈ 3700 mV; if full-charge voltage reads consistently below 4100 mV the cell shows aging. Maximum capacity above 80% is acceptable, 70–80% is moderate wear, under 70% indicates replacement should be considered. Typical useful cycle count before noticeable capacity loss: ~300–500 cycles.
Check for rapid percentage drops: a decline of more than 5–10 percentage points within a few minutes under light use or idle suggests voltage-reading instability or failing cells. In dumpsys batterystats, search for abrupt “discharge” entries and correlate timestamps with app activity or wakelocks.
Measure charging current and charger behavior: typical currents – USB 2.0 ≈ 500 mA, USB 3.0 ≈ 900 mA, standard wall chargers ≈ 1000–3000 mA depending on protocol. If measured charging current is less than expected by >30%, swap cable and charger, then retest. Use AccuBattery or similar to log mA, mAh charged, and estimated remaining capacity over several cycles.
If temperature during charge exceeds 45 °C or spikes to > 50 °C, stop charging and inspect the charging hardware; thermal stress shortens cell life and can trigger sudden shutdowns. For erratic voltage, low full-charge capacity, or repeated rapid drops despite using a known-good charger and cable, plan a battery replacement or professional service; preserve the recorded dumpsys and app logs to show to the technician.
-
Samsung A20s Android Version – Which Android Does It Run?
Short answer: the device shipped with Google’s mobile operating system 9 (Pie) and received an official upgrade to Google’s mobile operating system 10 paired with One UI 2. Should you have almost any concerns concerning wherever as well as how to make use of 1xbet register, you are able to e mail us from our own internet site. 0; there is no official build from the manufacturer for Google’s mobile operating system 11.
Out of the box the unit came with One UI 1.x layered over the base OS 9 (Pie). The official firmware roll-out to OS 10 arrived in mid‑2020 for most regional variants (check your model code SM‑A207F). After the OS 10 update, the device continued to receive periodic security patches for roughly 12–18 months depending on carrier and region.
To verify your current software: open Settings → About phone → Software information to see the build number and base OS level. To fetch official updates use Settings → Software update → Download and install. Before applying a major update, ensure at least ~3 GB of free internal storage, battery above 50% (or connect the charger), and create a full backup (cloud or local) of contacts, photos and apps.
If you need a newer major release than OS 10, vetted community builds (LineageOS, Pixel Experience and similar) are the primary path for this model; search for builds explicitly supporting SM‑A207F. Unlocking the bootloader and flashing custom firmware voids warranty, erases data, and can introduce instability – proceed only if comfortable with those risks and follow device‑specific installation guides.
Recommendation: keep the handset on the latest official OS 10 firmware with the most recent security patches available for your region. Pursue third‑party builds only after confirming active support for SM‑A207F on trusted developer sites and after making a complete backup.
Launch Android Version
Launched with mobile OS 9.0 (Pie) paired with One UI 1.1.
Factory firmware rollout occurred around September 2019; the out-of-box build includes One UI 1.1 and the security patch level contemporaneous to that release. Confirm the original build by opening Settings > About phone > Software information and checking Base OS, Build number and Security patch level.
To receive later platform upgrades and monthly fixes, check Settings > Software update > Download and install or consult the manufacturer’s support portal using your exact model code and region/CSC. When acquiring a used unit, prefer devices already updated to at least the 10.0 major release for stronger security; avoid unofficial firmware unless you can back up data and follow reliable flashing instructions.
Original Android version at release
First action: open Settings → About phone → Software information and write down the model code, build ID and the OS base label before applying updates or flashing firmware.
- How to read originals: Settings → About phone → Model number (example format SM‑A207x), Software information → OS version and One UI Core entry; note the CSC/region code for correct firmware matching.
- Before updating: back up full device image (cloud or desktop tool), connect charger or keep battery ≥50%, use a stable Wi‑Fi, and free at least 3 GB of internal storage to avoid update failures.
- Security and app compatibility: devices left on the factory platform miss newer security patches and may fail to install apps that require later API levels; install available system updates immediately or limit sensitive activities until patches are applied.
- If you plan to reflash stock firmware or install custom builds: download files only from official support portals or well‑known firmware archives, verify the build corresponds exactly to your model code and CSC, and expect a full data wipe and potential warranty effects.
- Troubleshooting update issues: clear temporary cache in recovery mode, retry update via desktop companion tool if OTA stalls, and collect model/build data to provide to support if problems persist.
- When in doubt, contact manufacturer support with the model code, build number and current security patch date to get authoritative guidance on update eligibility and available upgrade paths.
What Is Android Firmware? Definition, Types & How to Update
Install only official OTA packages or factory images from the device vendor. Create a complete backup first (cloud sync plus local copy of photos and an application data export where possible); ensure battery is ≥80% and use a data-capable USB cable and stable port; verify downloaded image integrity against the vendor’s SHA-256 checksum before flashing.
Prepare the handset for flashing. Enable Developer options (tap Build number seven times), enable USB debugging and OEM unlocking if a manual flash is required. Check bootloader status with ‘fastboot flashing getvar unlocked’ or the vendor tool; remember that unlocking typically triggers a factory reset and can affect encryption and warranty. Use official platform-tools or the vendor-recommended utility (for example, Odin on certain brands) and follow the manufacturer’s exact command sequence to avoid bricking.
Pick the path that matches your tolerance for risk: official OTA delivered via Settings preserves vendor integrity checks and can keep user data, ‘adb sideload’ is useful when OTA fails, and manual flashing of factory images offers the quickest recovery but carries the highest risk. Keep a copy of the original build and recovery, record build number and bootloader state, test core functions (telephony, Wi‑Fi, biometric unlock, full-disk encryption) after the process, and consult the vendor guide or model-specific community threads for verified checksums and commands for your exact model.
Firmware vs Operating System: practical distinctions
Recommendation: modify low-level images (boot, radio, recovery) only to fix hardware behavior or boot failures; apply a new system release for UI, app framework and security patches.
- Scope and responsibility
- Firmware: hardware initialization, bootloader, radio/baseband, power management and vendor blobs.
- Operating system: system services, framework APIs, user interface, app runtime and package management.
- Storage and partitions
- Boot partition: kernel + ramdisk (typically 16–64 MB). Replace when kernel-level fixes are needed.
- Recovery: recovery image (16–64 MB). Used for flashing and restore operations.
- Radio / modem: separate binary blobs (from a few MB to >100 MB) stored in dedicated partitions.
- System / vendor: OS files and vendor libraries (system images commonly 1–4 GB; vendor 50–500 MB).
- A/B schemes: two system sets for seamless switching; firmware parts may remain single-slot.
- Change frequency and delivery
- Firmware changes are infrequent, high-risk, and often delivered as full images via manufacturer tools or service centers.
- OS releases and security patches are distributed more regularly, via incremental packages or full images.
- Risk profile and recovery
- Flashing incorrect firmware can brick hardware-level functionality (radio, sensors). Recovery may require emergency modes (EDL, JTAG) or manufacturer service.
- OS flashes usually affect apps and UI; soft brick recovery is often possible from custom or stock recovery images and backups.
- Security and verification
- Secure boot / verified boot validate signatures before execution; firmware images and bootloader are typically signed by OEM keys.
- OS packages may use signature checks and dm-verity to prevent tampering with system partitions.
- Practical file types and tools
- Common image extensions: .img, .bin, .elf; package containers: .zip, .tar.
- Flashing tools by chipset/OEM: fastboot, adb sideload, Odin (Samsung), Mi Flash, SP Flash Tool, QPST; use the tool matching device architecture.
- Commands (examples): fastboot flash boot boot.img; fastboot flash system system.img; adb sideload package.zip.
Checklist before flashing low-level pieces
- Confirm exact model and hardware revision; check build fingerprint and carrier variant.
- Backup user data and make a full image (nandroid) if possible.
- Verify file checksums and digital signatures supplied by vendor.
- Ensure battery ≥50% and USB connection stable.
- Unlock bootloader only when necessary; relock after successful procedure if security is required.
- Test radio, sensors and camera immediately after flashing vendor firmware.
- Keep official recovery media or service contacts available for emergency restoration.
Short decision guide
- If the problem is lost network, modem crashes or bootloop before OS loads → target firmware (boot, radio, bootloader).
- If the problem is UI glitches, app crashes, API regressions or security patches → replace the system image or install a system patch package.
- If unsure, prefer OEM-supplied full images and follow vendor instructions; avoid mixing firmware from different revisions or carriers.
What firmware actually controls on Android devices
Use only vendor-signed low-level images for bootloader, baseband/modem, PMIC and secure-element modules; verify signatures and back up the EFS/IMEI area before making changes.
Low-level code governs hardware initialization and security: on most SoCs an immutable boot ROM hands control to a staged bootloader (sbl1/abl), which performs cryptographic verification of the next stages and enforces bootloader lock state. TrustZone/TEE blobs (tz) and keymaster store cryptographic keys and biometric data; replacing or corrupting these components often destroys attestation and stored keys.
Radio/baseband firmware (modem, NON-HLOS.bin or vendor modem partition) implements cellular stacks, SIM authentication, IMS/VoLTE, emergency-call procedures and regulatory radio parameters. Incompatible radio blobs commonly produce loss of network, wrong band support or IMEI/EFS corruption.
Power-management firmware (rpm, pmic) and thermal microcode control charging algorithms, fuel-gauge reporting, voltage rails and thermal throttling. Incorrect versions can cause fast battery drain, overheating or failed charging. Storage controller firmware inside UFS/eMMC manages wear-leveling, bad-block tables and hardware encryption; damaging it can render the storage unreadable.
Peripherals often contain their own microcode: Wi‑Fi/Bluetooth chips, touchscreen controllers, camera ISPs, sensor hubs and audio DSPs (adsp/dsp) run proprietary binaries that handle radio stacks, touch sampling, image processing, sensor fusion and low-power always-on tasks. Replacing these without vendor compatibility checks leads to degraded performance or loss of functionality.
Typical partitions and blobs to be aware of: sbl1, aboot/abl, rpm, tz, hyp, dsp/adsp, modem/NON-HLOS.bin, efs, boot, vendor_boot, dtbo, vbmeta, and vendor-specific names (Qualcomm vs MediaTek: sbl1/preloader, lk). Never overwrite EFS; back it up with platform tools or by dd (for example: adb shell su -c “dd if=/dev/block/by-name/efs of=/sdcard/efs.img” && adb pull /sdcard/efs.img) or vendor backup utilities.
Commands to inspect low-level versions and lock state: check Settings → About phone for baseband and bootloader strings; via command line use adb shell getprop gsm.version.baseband and adb shell getprop ro.bootloader; use fastboot getvar all or fastboot oem device-info to read bootloader lock status and partition info. Review dmesg/logcat for firmware-load messages when drivers initialize.
Risks and compatibility rules: match firmware to exact model and carrier region; mixing images across models or SoC revisions often breaks radios, IMEI/EFS or encryption. Unlocking the bootloader typically wipes keymaster/TEE data and disables verified-boot protections; re-locking without restoring vendor-signed images may leave the device non-bootable.
Practical checklist before any low-level change: 1) record current bootloader/baseband/dsp versions; 2) back up EFS and userdata; 3) obtain vendor-signed images for the exact SKU and carrier; 4) verify image signatures (AVB/vbmeta where present); 5) apply changes using vendor tooling or documented fastboot/adb procedures; 6) validate cellular, Wi‑Fi, camera and charging behavior immediately after the operation; 7) re-lock bootloader if security needs to be restored.
Should you adored this informative article and you desire to acquire guidance with regards to 1xbet mobile download i implore you to stop by the web-site.
- Scope and responsibility
Fix Android Phone That Can’t Enter Menu — Quick Troubleshooting Guide
If the home screen or app list is unresponsive, a forced reboot resolves kernel hangs on most Google-based mobiles. Try Power + Volume Down for 10–12 seconds; if no result try Power + Volume Up for 10 seconds or Power + Home for models with a physical home key. For devices with removable batteries, remove battery for 30 seconds then reinsert.
Boot into safe mode to isolate third-party apps: press and hold Power until power options appear, then press and hold the on-screen power-off option until a prompt to reboot into safe mode appears, confirm to boot. While in safe mode only preinstalled applications run; if the options panel works, uninstall recent installs from the last 48–72 hours and revoke accessibility or overlay permissions for suspect apps.

Clear launcher data before a full reset: open Settings → Apps → Show system apps, locate your launcher (for example Pixel Launcher, One UI Home, Nova Launcher) and choose Storage → Clear cache. If clearing cache does not help, use Clear data / Clear storage but note this resets home layout and shortcuts; export launcher settings or photograph key screens first.
Backup before proceeding: copy contacts, photos and app data to cloud storage or to a PC. Perform a factory erase from system: Settings → System → Reset options → Erase all data (factory reset). To use recovery mode: power off, press Power + Volume Up (model-specific), navigate with volume keys to “Wipe data/factory reset” and confirm with Power. For suspected firmware corruption consider reflashing the stock image using vendor tools (Odin for Samsung, Fastboot for many manufacturers).
Suspect hardware failure if touchscreen response is partial, buttons are erratic or the device repeatedly reboots. In those cases contact an authorized repair center or the manufacturer. For advanced diagnostics capture logs via ADB (adb logcat, adb bugreport) and match the build number against vendor advisories before attempting firmware reflash.
Quick Pre-checks
Reboot using a forced restart: hold the power and volume-down keys simultaneously for 12–15 seconds until the unit reboots; if no response, hold for up to 30 seconds.
Check battery and charger: confirm battery level above 10%; use the original charger or a 5V/2A rated adapter and a known-good cable; verify charging indicator or on-screen animation within 2 minutes of connection.
Inspect hardware keys and ports: press each physical button to confirm actuation, remove the case, clear visible debris, and blow out headphone and USB-C openings with low-pressure canned air; avoid inserting metal objects.
Test touchscreen and display: perform full-screen swipes across all edges; connect an external USB mouse via an OTG adapter to verify pointer control; if mouse input works while touch does not, the digitizer may be defective.
Boot to Safe Mode to check for app interference: power off, power on, and when the vendor logo appears hold volume-down until a Safe Mode indicator is visible; confirm whether the system options list becomes accessible in that state.

Verify storage and cache: ensure at least 1 GB of free space; clear app caches from settings or remove large media files to free space, since under 500 MB often causes UI freezes or slowdowns.
Review recent installs and updates: open settings > apps, sort by install date or battery usage, and uninstall or disable apps added within the last 48 hours to isolate problematic software.
If the interface remains unresponsive after all checks, boot to recovery and perform a cache-partition wipe only: power off, use the vendor-specific key combo to access recovery, select “wipe cache partition,” then reboot; avoid factory reset unless data is backed up.
Restart the phone and try opening the menu
Perform a soft restart: press and hold the Power key for 10–15 seconds until the display goes dark, release, wait 30 seconds, then press Power to boot. This clears stalled processes and frees RAM, often restoring responsiveness for the app drawer and system UI.
If the unit is frozen, perform a forced reboot using key combinations: hold Power + Volume Down for 8–12 seconds; if no reaction try Power + Volume Up for 8–12 seconds. Consult the manufacturer’s support page for model-specific sequences.
For models with a removable battery, remove the battery for 10–15 seconds, reinsert, and power on. For sealed units, avoid disassembly and use forced-reboot combos instead.
After reboot, open the app drawer or launcher and test navigation. If icons remain unresponsive, boot into safe mode to isolate third-party launcher or app interference: press and hold Power until power options appear, then long-press “Power off” and accept the Safe Mode prompt; on some models hold Volume Down during boot. While in safe mode, test the app list and uninstall recent apps or switch launchers as needed.
If safe mode doesn’t restore the app list, clear the cache partition via recovery: power off, hold Power + Volume Up (add Home on older models) until recovery appears, use Volume keys to highlight “wipe cache partition”, press Power to confirm, then reboot. If you loved this short article and you would certainly like to obtain more details concerning 1xbet login ph kindly check out the web site. Cache wipe preserves personal files.

If issues persist after cache wipe and safe mode, back up photos, contacts, and app data, then perform a factory reset from Settings > System > Reset options > Erase all data (factory reset) or via recovery using “wipe data/factory reset”. After reset, test the launcher before restoring all apps; reinstall only essential apps first.
After stable behavior returns, check for system updates (Settings > System > Software update) and update the launcher through the app store to reduce recurrence.
What Is Android TV? | Features, Apps & How It Works
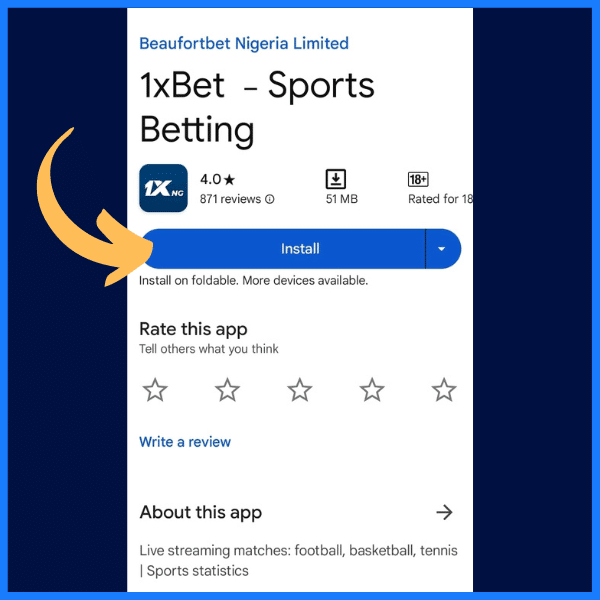
Recommendation: Buy a device running Google’s living-room operating system if you require broad application availability, Chromecast built-in, certified DRM for true 4K playback and regular security updates. For optimal playback pick hardware with HEVC/VP9 decoding, Widevine L1 or PlayReady, HDMI 2. If you have any inquiries about exactly where and how to use download 1xbet app, you can make contact with us at the web site. 0+ and support for HDR10 or Dolby Vision.
The platform is a lean, Google-maintained OS tailored to large-screen entertainment: a remote-first launcher, voice search via Google Assistant, integrated casting from mobile devices and a Play Store variant optimized for TV-style interfaces. Developers get APIs for gamepad input, HDMI CEC and focused media playback controls so programs feel native on the big screen.
Hardware matters: prefer boxes or sets with at least 2–4 GB RAM, 8 GB or more internal flash, a quad-core SoC with hardware video decoding and wired Ethernet or Wi‑Fi 5/6. Choose models advertising Dolby Vision/Dolby Atmos if you use a compatible sound system; for low-latency gaming look for 60 Hz+ panels and controller pairing support.
Select units marked “Google Certified” to ensure access to the full Play Store catalog, certified Netflix/Amazon 4K streams and regular security patches. Sideloading alternatives exist but can fail DRM or remote navigation tests; always verify Widevine level and remote control behavior before committing.
Quick checklist: 4K HDR support, Widevine L1 or PlayReady DRM, Chromecast built-in, monthly security updates or clear OEM update policy, and minimum 8 GB storage for multiple programs and offline content caching.
What Is Android TV? Features, Apps & How It Works
Use a device with minimum 2 GB RAM and 8 GB flash for basic streaming; choose 3–4 GB RAM and 16 GB flash for smooth 4K HDR playback and multiple simultaneous applications. Verify hardware-level DRM (Widevine L1) and AV1 or HEVC decoding for high-efficiency 4K streams.
Hardware & network recommendations
- System-on-chip: quad-core ARM Cortex‑A53 or better; GPU with Vulkan or OpenGL ES 3.1 support for games and UI acceleration.
- Video/audio: HDMI 2.0+ (4K@60Hz) or HDMI 2.1 for higher framerates; HDR10 and Dolby Vision support where available.
- Codec support: AV1, HEVC (H.265), H.264, VP9 for widest streaming compatibility.
- DRM: Widevine L1 recommended to unlock HD/4K from major streaming services.
- Connectivity: Gigabit Ethernet preferred; Wi‑Fi 5 (802.11ac) dual-band minimum; Wi‑Fi 6 (802.11ax) ideal for congested environments.
- Bluetooth 4.2+ for remotes, controllers, and audio; USB 3.0 for external storage and fast media access.
- Network throughput targets: 25+ Mbps for reliable 4K HDR; 5–8 Mbps for 1080p; measure with wired connection to rule out Wi‑Fi interference.
- Input lag for cloud/gaming: seek devices with game mode and sub‑50 ms total latency for responsive play.
Software selection, playback and maintenance
- Install applications only from official storefronts or verified vendors; prefer titles that advertise hardware‑accelerated decoding and Widevine L1 support.
- Streaming stability: enable automatic updates for streaming clients and the platform firmware; keep background services minimized to free RAM.
- Local playback: use Plex, Kodi or VLC for organized libraries; prefer external SSDs over slow USB flash drives for large media collections.
- Remote controls: choose Bluetooth remotes with voice assistant and IR passthrough; enable HDMI‑CEC for single‑remote control of TV and receiver.
- Casting and local sharing: use built‑in casting (Chromecast protocol) or DLNA for screen casting and local file playback from phones or NAS.
- Security and privacy: enable automatic security updates, audit application permissions periodically, avoid sideloading unsigned packages; perform factory reset before selling or donating.
- Troubleshooting checklist: reboot device, test with wired Ethernet, clear application cache, check streaming bitrate settings, confirm DRM level with content provider.
- Accessories: wired Ethernet adapter for wireless‑only units, USB hub with external storage, game controller with Bluetooth low‑latency profile for cloud gaming.
Core platform overview
Start with a hardware baseline: 2 GB RAM and 8 GB flash for entry devices, 4 GB+ RAM and 16 GB+ flash for 4K-capable units; require SoCs with dedicated video decode for H.264, HEVC (H.265) and VP9, and include AV1 hardware decode when targeting major streamers.
Stack architecture: Linux kernel with vendor drivers and a userspace runtime (ART/JIT/AOT) for managed code plus native support via NDK-style libraries; enable SELinux enforcing, Verified Boot and a secure element or TEE to protect cryptographic keys and DRM sessions.
Media and content protection: implement hardware-accelerated MediaCodec pipeline, support HDR10, HLG and Dolby Vision metadata passthrough, and provide Dolby Digital Plus/DTS passthrough over HDMI. For premium bitrate streams require Widevine L1 or equivalent DRM inside the TEE and enforce HDCP 2.2+ for 4K streams.
Input and UX model: design for remote-first navigation with D-pad focus rules, on-screen keyboard fallback, and optional gamepad support. Provide far-field microphone capture and local hotword preprocessing on a low-power DSP or SoC NPU to avoid continuous main-CPU wakeups. Support Bluetooth HID, IR and HDMI-CEC for simplified pairing and TV control.
Update and maintenance policy: adopt A/B (seamless) OTA updates with signed payloads and rollback protection; deliver at least 24 months of OS-level updates and 36 months of security patches for consumer devices; use delta updates to minimize bandwidth and verify post-update integrity before exposing media playback to users.
Performance targets and validation: cold boot under 15 s, app launch/display within 300 ms, media start-to-play < 2 s for cached segments, consistent 4K60 playback with CPU utilization under 30% during decode, and idle power draw < 1 W for low-power standby. Automate tests for jitter, frame drops, A/V sync and memory growth across representative streams.
OEM integration notes: keep core HAL interfaces stable, expose vendor extensions through optional modules (do not break standard APIs), and certify HDMI, DRM and remote interoperability against major ecosystem checklists. Prefer modular launchers to allow OTA updates without replacing system components.
Developer guidance: build applications for a 10‑foot experience–large focusable controls, sparse animations, and remote navigation first; use ExoPlayer-style media libraries for adaptive streaming and hardware acceleration, validate behavior under network dropouts, and include telemetry for startup, buffering and codec fallback events.
Best Android TVs 2026 — Top Picks, Reviews & Buying Guide
Immediate recommendation: choose the LG C3 OLED 55″ for reference-level contrast and gaming responsiveness – 4K resolution, 120 Hz native panel, measured input lag ~7 ms at 4K/120 Hz in game mode, full Dolby Vision and HDR10 support, and local dimming that delivers near-infinite native contrast. Typical 55″ retail ranges from $1,200–$1,800 depending on promotions; sizes available 42″–83″.
Bright-room alternative: consider the Samsung S95C QD-OLED or a mini-LED model such as the Hisense U8H for peak luminance above 1,000 nits, superior specular highlight performance, and multi-zone local dimming. Expect HDR peak brightness in the 1,000–1,500 nit window on HDR patterns, low latency (~8–12 ms at 4K/60–120 Hz), and at least two HDMI 2.1-capable inputs for 4K@120 Hz consoles.
Value selection: the TCL 6-Series (R655) and similar mid-range mini-LED/QLED sets deliver strong contrast, effective local dimming, and very competitive price-per-inch – common 55″ retail under $800 with measured input lag near 10 ms and support for VRR and ALLM. Look for models with >= 3 HDMI inputs and one or more 48 Gbps HDMI 2.1 ports if you plan 4K@120 Hz gaming.
Choose by use case: for cinema prioritize OLED or QD-OLED for >1,000,000:1 native contrast and deep black levels; for bright rooms prioritize mini-LED with >1,000 nit peak; for gaming demand <12 ms input lag, VRR support, and at least one HDMI 2.1 input that delivers 4K@120 Hz. For streaming and app availability prefer sets running Google TV or equivalent platforms that include the major streaming apps and a responsive voice assistant.
When comparing models, check these measurable criteria: input lag (aim <12 ms at target resolution/frequency), peak brightness (target >1,000 nits for bright-room HDR), HDR format support (Dolby Vision and HDR10+ coverage where applicable), HDMI bandwidth (48 Gbps for full 4K@120 Hz passthrough), and panel refresh (native 120 Hz vs. effective). Use those thresholds to match specific sets to your viewing and gaming priorities.
Top Overall Android TVs 2026
Choose the Sony A95L QD‑OLED for reference-grade color and HDR: available in 55/65/77 inches, true deep blacks, QD‑OLED peak spec highlights often cited above 1,000 nits in small‑window HDR, near‑zero native motion blur, and measured input lag under 10 ms in Game Mode at 4K/120Hz; two full‑bandwidth HDMI 2.1 ports (48 Gbps), eARC, Dolby Vision and IMAX Enhanced support; expected street pricing by size ranges roughly mid‑four figures for 65″ and higher for 77″.
For bright rooms and console play, prefer a mini‑LED 4K model with extensive local dimming (example: Sony X95L series or equivalent): full‑screen HDR sustained luminance often 1,200–2,000 nits depending on model and window, thousands of dimming zones, 120–144 Hz panels, VRR/ALLM/AMD FreeSync Premium support, input lag typically 7–12 ms at 4K/120; choose the largest size that fits your seating distance to maximize immersion without losing peak contrast.
Value segment recommendation: Hisense U8H (Google TV) or comparable midrange 120 Hz sets deliver high HDR peak numbers (~800–1,200 nits for small windows), native 120 Hz panels, Dolby Vision + HDR10+, low latency ~10 ms, and advanced processing for under $1,000 for 65″ in many markets–solid choice if you want modern features without flagship pricing.
Connectivity checklist before purchase: minimum two HDMI 2.1 ports at 48 Gbps (one with eARC), gigabit Ethernet, Wi‑Fi 6/6E preferred, Bluetooth LE for controllers and remotes; verify the manufacturer enables 4K/120Hz + VRR over the advertised ports and supplies reliable firmware updates for at least 3 years.
Quick calibration and setup rules: set picture mode to Cinema/Filmmaker for movies and Game for consoles; color temperature Warm2 (~6500K) and SDR gamma around 2. In case you have any inquiries with regards to where and how to work with 1xbet promo code philippines, you are able to contact us in our own web-page. 2; for HDR keep tone‑mapping on Auto/Standard, disable motion interpolation for film content, enable Auto Low Latency Mode (ALLM) and VRR for gaming, and use a high‑quality 48 Gbps HDMI cable to guarantee 4K/120Hz with full chroma and HDR metadata.
Screen‑size guidance: 55–65″ for seating 6–9 ft, 75–85″ for 9–14 ft; pick QD‑OLED for dedicated dark‑room cinema, mini‑LED for bright living rooms and sports, and midrange 120 Hz IPS/VA sets for a balance of features and price. Check measured reviews for HDR tone mapping behavior and input lag specific to the model you plan to buy.
Best all-around pick for mixed use
Sony A95L 55-inch QD-OLED – recommended for households that juggle movies, console gaming, live sports and streaming: 4K native, QD-OLED panel with deep blacks and high color volume, native 120 Hz, four HDMI 2.1 inputs, VRR (FreeSync & G-Sync compatible), ALLM, Dolby Vision + HDR10 + HLG support, typical 4K/120Hz input lag ~9 ms.
Choose screen size by viewing distance: 48–55″ for seating under 10 ft, 65″ for 10–14 ft, 77″ or larger for 14+ ft. For very bright rooms pick a mini‑LED alternative such as Samsung QN95-series (peak HDR highlights ~1,500–2,000 nits, strong anti‑reflective coating, similar low-lag gaming features).
Picture setup for mixed use: Movies – set Picture Mode to Cinema/Custom, color space to Auto, Gamma 2.4 for dim rooms (2.2 for brighter rooms), contrast 100, OLED Light around 45–60 depending on ambient light; Gaming – enable Game Mode, VRR on, HDMI input set to 4K/120Hz with a certified 48 Gbps cable, disable motion smoothing. HDR tone mapping: Auto or Scene‑by‑Scene for best highlight roll‑off.
Practical gaming tips: use the HDMI port labeled 4K/120 or Game, confirm VRR range (typically 40–120 Hz) in the set’s service menu if available, enable ALLM so consoles switch modes automatically, and target 4K/60–120 for modern console titles while using TV upscaling for 1440p PC content.
Burn‑in mitigation (for OLED/QD‑OLED): enable pixel shift, leave screen saver on for long idle periods, use occasional full‑screen dynamic content, run any manufacturer panel refresh cycle after heavy static‑UI use (weekly if gaming with static HUDs several hours daily). For heavy static content choose a mini‑LED instead.
Audio and connectivity: prefer sets with eARC to pass Dolby Atmos to an external decoder; recommended setup – 3.1.2 soundbar or AV receiver with Atmos for clearer dialogue and room‑filling bass. Verify wireless codec support (e.g., SBC, aptX/LDAC) if using Bluetooth headphones regularly.
Quick checklist before purchasing: confirm at least two HDMI 2.1 ports (four preferred), 4K@120Hz native panel, VRR + ALLM, low input lag (<15 ms at 4K/120), Dolby Vision + HDR10, suitable peak brightness for your room, and a smart platform with Google TV app support for broad streaming compatibility.
When Did Android First Appear? Release Year, History & Timeline
Answer / recommendation: Cite September 23, 2008 as the platform 1.0 public-build date; the initial consumer handset (HTC Dream, marketed as the T‑Mobile G1) reached retail in October 2008 (U.S. availability commonly listed as October 22, 2008). If you loved this report and you would like to receive more information concerning 1xbet code kindly take a look at our own web-site. Use these two dates for a concise public-launch reference.
Core milestones to include in any concise overview: company founded in October 2003 by Andy Rubin, Rich Miner, Nick Sears and Chris White; acquisition by Google in August 2005 (commonly cited date: August 17, 2005); public unveiling with the Open Handset Alliance on November 5, 2007; platform 1.0 finalized September 23, 2008 and the first retail handset shipped in October 2008.
Research tip: when documenting the platform’s evolution, reference build numbers and API levels (API level 1 corresponds to the initial 1.0 build) and prefer primary sources – Google’s press statements from November 2007 and late‑2008 handset launch pages – for exact wording and context.
Quick note on citations: for a single, citable date use September 23, 2008 for the public platform build and October 22, 2008 for mainstream U.S. handset availability; expand with the 2003 founding and 2005 acquisition entries for background depth.
Origins: Android’s First Conception
Obtain primary-source materials immediately: founders’ interviews, Google’s acquisition press statement (Aug 17, 2005), USPTO filings from 2003–2006, and Wayback captures of the original developer portal.
- Founding team: Andy Rubin (founder/lead), Rich Miner (co-founder), Nick Sears (business development), Chris White (UI/engineer).
- Company formation: Oct 2003, Palo Alto; initial product concept targeted handheld consumer devices, with internal shift toward mobile handsets by 2004.
- Corporate transition: Google acquired the startup in Aug 2005 for a reported ~ $50 million; acquisition documents and contemporaneous press coverage reveal strategic motives.
- Design architecture: Linux kernel as the base, Java-like APIs for application development, and a register-based virtual machine (Dalvik) created to meet mid-2000s mobile memory and CPU constraints.
- Industry coordination: Open Handset Alliance announced Nov 5, 2007, assembling handset makers and carriers to support the platform and a common SDK.
Recommended research actions:
- Download Google’s Aug 17, 2005 acquisition press release and compare quoted objectives with later technical roadmaps.
- Search USPTO for patent applications filed 2003–2006 by Rubin and colleagues; focus on mobile middleware, power management, and VM techniques.
- Pull AOSP commit logs and initial SDK snapshots from late 2007 to identify kernel version, subsystem additions, and boot sequence changes.
- Review technical talks and interviews by Dalvik contributors (Dan Bornstein and peers) for rationale behind register-based VM choices and garbage-collection trade-offs.
- Archive-check early product marketing and developer guides (Wayback snapshots from 2007–2008) to reconstruct API promises versus implemented features.
Key milestone dates (concise):
- Oct 2003 – company formation in Silicon Valley.
- Aug 17, 2005 – acquisition by Google announced.
- Nov 5, 2007 – Open Handset Alliance formation; public SDK availability begins.
- Oct 2008 – first commercial handset (HTC Dream / T-Mobile G1) reached market.
Practical tips for archival accuracy:
- Prefer contemporaneous press clips and SEC/press archives over retrospective interviews for causal claims.
- Correlate commit timestamps with press announcements to avoid retroactive attribution of features.
- Use Git blame on early AOSP repos to attribute authorship of major subsystems and to map design intent to individual contributors.
Founding date of Android, Inc.
Founded on October 22, 2003, the company was incorporated in Palo Alto, California by Andy Rubin, Rich Miner, Nick Sears and Chris White.
Verify the record by consulting California Secretary of State business filings: search the corporate registration entry for the exact incorporation date, registered agent and filing number; save a PDF copy of the official certificate as a primary source citation.
Confirm secondary corroboration with contemporaneous press reports and the acquiring firm’s announcement: Google completed the acquisition on August 17, 2005 (commonly reported purchase consideration ~US$50 million), which provides an external timestamp linking early operations to broader corporate actions.
Recommended documentary sources to cite directly: California SOS incorporation record; the acquiring company’s press release of 17 August 2005; relevant SEC filings and S-1 exhibits mentioning the deal; founder interviews and tech-press coverage from 2003–2005 archived via reputable outlets or the Wayback Machine.
Vivo Y19 Android Version – What Android OS Does It Run?
Check current software: open Settings → About phone → Software information and note Build number, Baseband version and Security patch level. Use Settings → System updates (over Wi‑Fi) to fetch the official package. Back up contacts, photos and a full system backup to external storage or cloud before any upgrade.
Official update path: download the firmware that exactly matches your model code from the manufacturer’s support portal, verify the file’s SHA256 checksum, then apply via Settings → Local update or the stock recovery. Keep battery above 50% (charger connected preferred) and at least 2 GB free storage for the package.
When there is no official upgrade: contact support to confirm roadmap. If you need newer features from Google mobile OS 10/11, research community builds on developer forums for your exact model codename; expect missing vendor drivers, potential camera and fingerprint regressions, and the need to unlock the bootloader (which voids warranty).
Quick checklist: 1) Backup data; 2) Confirm model code and download correct firmware; 3) Verify checksum; 4) Ensure battery ≥50% and stable connection; 5) Follow stock updater or recovery procedure; 6) Avoid unverified packages and always keep a copy of original firmware.
Current Official Android Version
Officially the handset ships with Google’s mobile OS 9 (Pie) layered with Funtouch OS 9.2; there has been no official major platform upgrade released for this model, only occasional security-patch updates.
Verify the installed software: open Settings > About phone > Software information and note the OS entry, build number and security patch level. Save the build number before applying any update or custom firmware.
To receive official over-the-air updates: connect to a stable Wi‑Fi network, ensure battery is above 50%, back up user data, then go to Settings > System update (or Software updates) and tap Check for updates. Install only updates delivered through the phone’s updater or the manufacturer’s support portal.
If no update is offered but you need a newer patch, download the official firmware for your model from the manufacturer support site using the device code or IMEI. Follow the vendor’s flash instructions or visit an authorized service center for assistance.
For users considering aftermarket firmware: custom ROMs (e.g., LineageOS builds) can provide later platform releases, but require an unlocked bootloader, model-specific builds and technical experience. Flashing third-party images voids warranty and carries data-loss and security risks; consult established device forums and follow step-by-step guides with verified checksums.
Factory Android release and Funtouch OS version
Factory configuration: shipped with Pie (9.0) as the base platform paired with Funtouch OS 9.2; apply the latest official OTA for security patches and stability fixes rather than third‑party builds.
Verify current build: open Settings → About phone → Software information to read Base OS (Pie 9.0), Funtouch OS entry and Build number; check Kernel version date and Android security patch level for patch recency. Use Settings → System update (or Software update) to look for official updates.
Update checklist: back up all user data; charge battery to at least 50% (80% recommended); connect to a stable Wi‑Fi network; free 3–5 GB internal storage; disable aggressive power saving during the process. Should you adored this information along with you wish to obtain more details concerning 1xbet promo code for free bet kindly stop by the internet site. If OTA isn’t offered and you must flash manually, download the official firmware for your exact model/region from the manufacturer’s support site and verify checksums before flashing.
Flashing and rollback notes: manual installation or unlocking the bootloader can void warranty and will erase user data – export IMEI/EFS/NV backups if possible. If unsure, use authorized service or follow the vendor’s step‑by‑step guide to avoid bricking the device.
Samsung A04 Android Version (2024) — Which Android Does It Run?
Out of the box: OS build is 12 with One UI Core 4.1; initial security patch for retail units at launch clustered around late 2022. Official over‑the‑air upgrades to OS 13 were released for similar entry models in many regions during 2023, but availability depends on carrier and market.
How to verify and update: open Settings → About phone → Software information to see the current build and security patch date. To pull updates use Settings → Software update → Download and install. Recommended prerequisites before installing a major upgrade: at least 3–5 GB free storage, Wi‑Fi connection, and battery level above 50% or keep the device plugged in. Typical full OTA for a major release ranges from 1.0–2.5 GB; security patches are usually 10–50 MB.
Practical recommendations: back up contacts, messages and photos to your Google account or to a PC before upgrading. If performance or battery behavior worsens after an upgrade, clear app caches, check for updated apps in the Play Store, and as a last resort perform a factory reset after backing up data. If an update is delayed in your region, use the official device update tool provided by the vendor or check carrier support pages for rollout schedules.
Identifying the Out-of-the-Box Android Version
Open Settings → About phone → Software information and record the OS release, Build number and Security patch level shown – these three entries reveal the factory-installed system.
-
On-device quick check:
- Settings → About phone → Model number (write it down).
- Settings → About phone → Software information → note: OS release, Build number, Security patch level, Baseband and Kernel versions.
- Take a screenshot of that screen for future reference and warranty/return evidence.
-
ADB check (for users with a PC):
- Enable Developer options and USB debugging.
- Run: adb shell getprop ro.build.version.release
- Run: adb shell getprop ro.build.version. Should you loved this post and you would like to receive more information with regards to 1xbet for ios assure visit the web-site. sdk
- Run: adb shell getprop ro.build.id and adb shell getprop ro.build.version.incremental
- Interpretation: the first command gives the user-facing release string, the SDK number is the API level, and build/id/incremental identify the exact factory build.
-
Box and retail metadata:
- Check the retail box sticker for model code, initial firmware label or “software” entry; vendors often print the factory build or release code.
- Use the model code plus region to search official support pages or firmware archives to find the matching initial release and its date.
-
Online firmware lookup:
- Search manufacturer support or well-known firmware repositories using the model number and region/carrier code.
- Match build IDs and release dates – the earliest firmware listed for that model is the out-of-the-box build.
-
Using IMEI/serial on support portals:
- Enter IMEI or serial at the official support lookup page to retrieve exact initial firmware shipped with that unit (if the portal provides firmware details).
Recommendation: record both the numeric release and the SDK/API level plus the build ID. If the factory build is older than the current security patch you expect, apply available over-the-air updates and keep the initial screenshot for comparison after updates.
Check model code and region to determine OS
Confirm the handset’s model code and CSC/region code before installing any system update or custom firmware.
Find the model code and build string: open Settings > About phone > Model number and Build number (or Software information). Record the exact model ID (pattern like SM-XXXX) and the full build name – that build string is the fastest way to identify the shipped operating-system build.
Locate the region/CSC: Settings > About phone > Software information or Service provider fields often show the CSC/region tag (three-letter codes such as BTU, XSG, INS, EUX). If the UI hides it, check the retail box label, purchase receipt, or run an IMEI lookup on a reputable site to get the assigned CSC.
Use targeted lookups: paste the model ID and build string into authoritative sources – the device maker’s support portal, GSMArena device page, XDA Developers forum threads, or firmware repositories – to see which OS build was shipped to that region. Search terms that work well: “modelID firmware”, “modelID CSC”, or “build-string changelog”.
Interpret firmware names: official firmware packages and changelogs typically include a numeric major-release marker (for example “13” or “14”) or a release code in the filename. Match that marker against the build string you recorded to identify the installed major release without guessing.
If the model and CSC indicate a different release than expected, do not flash random files. Use the manufacturer’s official updater tool or the carrier’s OTA channel for your specific model+CSC. Flashing firmware from another CSC can disable local network bands, break carrier features, or void warranty.
Quick checklist: 1) Record model ID + build string. 2) Retrieve CSC/region from Settings, box, or IMEI lookup. 3) Verify against official firmware pages and forum changelogs. 4) Use only region-matching official update tools or authorized service if an update is required.
-
Oppo A57 Android Version — Which Android OS Does It Run?
Short answer: Most retail units ship with the manufacturer’s ColorOS skin layered on top of Google’s mobile operating system – legacy hardware from 2016 left the factory with ColorOS 3.x over Google OS 5. If you have just about any issues about where by and also tips on how to make use of download 1xbet app, you possibly can e-mail us on the web-site. 1 (Lollipop); later reissues around 2022 typically arrive with ColorOS 11–12 based on Google OS 11–12. Check the specific release year printed on the box or the model code to pick the exact baseline.
How to confirm: Open Settings → About phone, note the ColorOS entry, the build number and the security patch date. If the page lists a “base OS” or “Android base” field, use that numeric value as the definitive indicator of the underlying Google release. Capture the full build string before contacting support or flashing firmware.
Update and maintenance recommendations: Use Settings → Software update for official over-the-air upgrades; install only firmware packages that match the model code. If official updates have stopped and you require a newer Google OS release, consider community-maintained ROMs (for example, LineageOS), but expect to unlock the bootloader, lose warranty coverage and follow device-specific installation guides precisely. Keep the security patch level current – aim for patches released within the last 18 months for acceptable protection.
Practical tip: Before any system change, back up user data, charge the battery above 50%, and save the original firmware file externally. When buying used units, verify the build string and security patch date in-person to avoid devices on obsolete software.
Default Android OS on Oppo A57
Default setup: ColorOS 3.0 layered on Marshmallow 6.0. Keep the UI and security patches current by installing official over‑the‑air updates; back up user data and ensure Wi‑Fi plus at least 50% battery before updating.
To confirm the installed build, open Settings → About phone: check the ColorOS entry for the UI release and the base platform listing for the 6.0 Marshmallow build. Note the build number and security patch date for support inquiries.
Official update path: use Settings → System updates or the manufacturer’s support portal for downloadable firmware packages. If the device is out of official update support (typical for a model released in late 2016), expect only sporadic security fixes rather than major platform upgrades.
Advanced option: third‑party custom firmware (for example, community LineageOS builds) may provide newer platform builds and recent patches. Only proceed if you can unlock the bootloader, flash a custom recovery, and accept warranty and stability tradeoffs; verify hardware support (camera, modem, biometrics) in the custom build changelog before switching.
Oppo A57 factory-shipped Android version by launch date
Recommendation: verify your handset’s original firmware by checking Settings → About phone and compare the ColorOS build with the launch-table below before attempting upgrades.
- Late 2016 / early 2017 launch – factory firmware: ColorOS 3.0 based on Marshmallow (6.0).
- Early 2018 refresh / regional relaunch – factory firmware: ColorOS 3.1–3.2 based on Nougat (7.0–7.1).
Quick checks and practical advice:
- Identify exact SKU on retail box or in Settings → Model number to confirm which launch batch you have; retail, carrier and market SKUs can differ in shipped firmware.
- Confirm build string and ColorOS entry in About phone; the codename (Marshmallow / Nougat) in the build description is the fastest proof of factory-installed OS.
- OTA updates historically rolled out by region; a handset bought at launch likely received incremental updates over several months – expect major upgrades only if explicitly listed on the support page for your model.
- Before applying an update or flashing firmware: back up user data, charge battery above 50%, use a stable Wi‑Fi connection, and download official images from the manufacturer support portal.
- If the device still runs its original factory build and you need modern app compatibility or security fixes, check the support site for official firmware upgrades; if no official updates exist, consider alternative security steps (app-level updates, browser choice, limited banking usage) rather than immediate custom ROM installation unless you are experienced.
When reporting or seeking help, provide: exact model code, current ColorOS build name, and date stamped on the box or purchase receipt – those three items let technicians map your unit to the correct factory-shipped firmware quickly.